Easter Bliss

Friday, 1 December 2023

Creative Artiste #100 December 2023

 This is my second post for today. The first one is a set of Christmas cards for Crafts Galore Encore. Please scroll down for a look.

I am approaching the end of 2023 with mixed feelings. The year started off with such promise with two much anticipated weddings in the spring. Then it took a terrible turn with the events of the summer, ending with my beloved brother passing away with hardly any warning. I really don't remember much of autumn. It's all a blur through the tears. Winter is going to be a difficult season with Christmas and birthdays to get through as the family still grieve. But, I'll wear a smile and soldier on through.

I'm keeping my fingers crossed that 2024 will bring only good news and happy events. For everyone.

*I've copied this introduction from my earlier post as there really isn't anything more to say.*

Now, on a happier note ....

.... There is a celebration going on at Creative Artiste this month as it's our 100th challenge!

 Welcome to the 100th challenge at

Creative Artiste is a monthly challenge blog for everyone who likes to mix their media. So, as long as you like to use various mediums on your creations, we'd love to see you enter the challenge.
A big Thank You to everyone who entered the challenge last month. Your projects were all fabulous and our winners have been announced on the blog.

Our theme is always
"Anything Mixed Media Goes"
But we have decided to add an optional theme of
'Christmas' for December.
And for this month only, there will be a prize for our winner!
We still have opportunities to be a Guest Designer for all our winners though, as per usual.


As we have the optional theme of 'Christmas' this month, I've made a very typical Christmas decoration.

I made a nativity scene using some foam characters our little princess was given at church last year. They were to make an advent calendar but she wanted to play with them instead. This year they have been given a more permanent purpose.
The stable measures 7" w x 6" h x 3" d (18 x 15 x 8 cms).


Most of the project was prepping and creating the stable. I started by cutting out the pieces for the stable from strong greyboard and giving them a couple of coats of DecoArt Dark Chocolate acrylic paint. I then used a Tim Holtz woodgrain stencil with Black Soot Distress Ink to add the appearance of texture.


I assembled the stable using Heavy Body Gel. And then mixed texture paste with the Dark Chocolate acrylic paint and tapped it around the arched entrance. The tiles for the roof were created using greyboard, painted with Docraft's Burnt Sienna acrylic paint and fixed in place with more texture paste coloured with the paint. The last bit of prep was the 'straw'. I coloured some tissue paper with Squeezed Lemonade DOX and Scattered Straw DI before cutting it into thin strips.

I arranged the characters and fixed them in place with Heavy Body Gel before scattering the straw around them. Some of the pieces were glued to the outside of the stable.


The last angel is dangling on a thin strip cut from an acrylic sheet and fixed to the roof so she can happily  bounce around.
All the characters are firmly glued in place, so, it's not an interactive plaything. Instead, it makes for a cheerful, and thoughtful, decoration lest we forget the true meaning of Christmas.

Now it's your turn to have fun and create your mixed media projects. The 'Christmas theme' is only an option for December so you can still play along with your 'Anything Goes' projects. You can enter our challenge as many times as you like. A full list of the rules is on the challenge blog. For more inspiration please visit the Creative Artiste Challenge Blog to see the fabulous mixed media projects created by our multi talented team.
Remember to have fun crafting and enter your creations in our 
100th challenge. 

Have a fun festive season everyone, however you celebrate!

I have entered this project in the following challenges:

Crafts Galore Encore December 2023

I am approaching the end of 2023 with mixed feelings. The year started off with such promise with two much anticipated weddings in the spring. Then it took a terrible turn with the events of the summer, ending with my beloved brother passing away with hardly any warning. I really don't remember much of autumn. It's all a blur through the tears. Winter is going to be a difficult season with Christmas and birthdays to get through as the family still grieve. But, I'll wear a smile and soldier on through.

Now, the first of my two challenge posts for today ...

Welcome to the last  Crafts Galore Encore Challenge for 2023

Thank you to everyone who joined in with last month's challenge. The winners have been announced on the challenge blog. This is a month long challenge and you can enter up to three times. There is a full list of rules on the challenge blog.

Our theme every month is the popular
"Anything Goes"
and our sponsor this month is:

who are offering a very generous prize of a $25 store voucher for our lucky winner.


I have made a set of 6 Christmas cards using three different collections from the Gecko Galz shop. 
The cards are all 6" (15 cm) square. All the coloured card for the mats and layers is from Papermania. The cards were all finished off with ribbon bows and gems.

I was allowed to choose the images and papers from the store for these cards. I chose Altered Christmas Digital Collage Sheets, which has two pages of gorgeous images and tags. 
And Christmas in Nature ATC Set which has six beautiful pages for the backing papers. Plus a sentiment.
A couple of the images on the cards are from another collage set that has since, unfortunately, sold out.


The lovely vintage looking papers on these cards are from the Christmas in Nature ATC set and the tags are from the Altered Christmas set. I fixed the tags to the card with brads so the top one can swivel to reveal the second tag.
The Santa image toppers are, sadly, no longer available.

I printed the gorgeous poinsettia paper from the Christmas in Nature ATC set a few times, and slightly larger, so I could cut out the flowers and decoupage them using foam pads. The Peace on Earth sentiment is also from the ATC set. The sentiment and music sheet on the bird card are from the Altered Christmas set.


The card on the left is made using another wonderful vintage paper from the ATC set and my two favourite tags from the Altered Christmas set. For the card on the right, I printed out the red cardinal a couple of times from the bird paper and decoupaged it with foam pads. I teamed it with a sentiment from the Altered Christmas set. The background is the lovely ribbon and holly paper from the ATC set and I used an off cut  from the bird paper as a panel across the front.

Now please visit the  Crafts Galore Encore challenge blog where you can see the wonderful projects and cards created by our talented team using Gecko Galz images.
Grab some inspiration while you're there and enter your "Anything Goes" creations in this month's challenge.

Thank you everyone for supporting us throughout this year. We hope we have inspired you on your creative journey as much as you have inspired us.
Enjoy a merry festive season, however you celebrate.

I have entered this card set in the following challenges:
https://morgansartworld.blogspot.com/2023/12/morgans-artworld-challenge-12.html

Friday, 3 November 2023

Creative Artiste #99 November 2023)

  ....Welcome to a new challenge at

Creative Artiste is a monthly challenge blog for everyone who likes to mix their media. So, as long as you like to use various mediums on your creations, we'd love to see you enter the challenge.
A big Thank You to everyone who entered the challenge last month. Your projects were all wonderful and our winners have been announced on the blog.
Our theme is always
"Anything Mixed Media Goes"
We have opportunities to be a Guest Designer for all our winners.

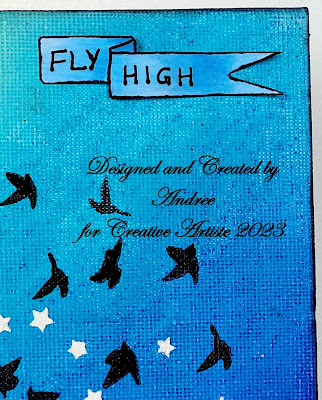
I have made a small ombre canvas using a fun technique I haven't done in a while.

I used my Crayola wax crayons for the background. I scribbled the colours onto the canvas and heated them up with my heat gun. I added more crayon as I went along and blended the colours with a dry cloth.


I added the stars using home made texture paste through a Dinky Stencil from That's Crafty. Before the texture paste had dried I painted the stars with DecoArt Glamour Dust to give them a subtle sheen.


I then added the birds using a Bee Crafty stamp called Winged Things with black Versafine ink. There is also a single bird stamp from an old Docrafts set that I used randomly too.


The birds are on one stamp and I cut a few of them free to use individually. I stamped those in between the stars. To be honest I'm not sure all of the birds are flying upright. Oops! But I like the overall effect.


I hand drew the banner, cut it out and coloured it with Copics to match the canvas colours. I wrote the sentiment with a black Posca pen and added it to the canvas with foam pads.

Now it's your turn to have fun and create your mixed media projects. You can enter our challenge as many times as you like. A full list of the rules is on the challenge blog. For more inspiration please visit the Creative Artiste Challenge Blog to see the fabulous mixed media projects created by our multi talented team.
Remember to have fun crafting and enter your "Anything Mixed Media Goes" creations in our 
November challenge. 

I have entered this project in the following challenges:

Wednesday, 1 November 2023

Crafts Galore Encore November 2023

Following a shocking family bereavement in the summer I haven't been in the mood to do much crafting. But, we are creeping close to Christmas and I need to get a move on making my cards. What better way to start than with the cute image and lovely paper from our sponsor? This is my official first Christmas card of 2023 and I've made it to hopefully inspire you for the new challenge starting today at ....

Thank you to everyone who joined in with last month's challenge. The winners have been announced on the challenge blog. This is a month long challenge and you can enter up to three times. There is a full list of rules on the challenge blog.

Our theme every month is the popular
"Anything Goes"
and our sponsor this month is:
who are offering a prize of 3 digi images to our lucky winner.

I've made an acetate fronted Christmas card. The acetate wraps around the card front and is fixed in place with strong double sided tape on the left hand side at the back.

The card base is 6"x 6" (15 x 15cms). I used a pink card from Papermania for the mats, border and sentiment.


The team was kindly given the For Santa stamp set to use. The set includes a pretty backing paper, a pre-coloured image and a black and white image. I used the pre-coloured image and die-cut it in a circle. I fixed the image onto the front of the piece of acetate. I glued a pink circle onto the reverse side of the acetate behind the image to create a mat.


I enlarged the pretty paper on the computer and trimmed it down to size before matting it onto pink card and fixing it to the card front. I added the die-cut sentiment.


I used an X-Cut punch to create the border and attached it with double sided tape. I finished the card with some pink gems.

Now please visit the  Crafts Galore Encore challenge blog where you can see the wonderful projects and cards created by our talented team using The Paper Shelter images.
Grab some inspiration while you're there and enter your "Anything Goes" creations in this month's challenge.

I have entered this card in the following challenges:

Friday, 6 October 2023

Creative Artiste #98 October 2023

Grief affects everyone differently. I find myself just wanting to hide away since my wonderful brother was so cruelly, and suddenly, snatched from us. I have very little interest in all the things I previously enjoyed. However, I did manage to create something personal this past week ....

  ....Welcome to a new challenge at

Creative Artiste is a monthly challenge blog for everyone who likes to mix their media. So, as long as you like to use various mediums on your creations, we'd love to see you enter the challenge.
A big Thank You to everyone who entered the challenge last month. Your projects were all fabulous and our winners have been announced on the blog.
Our theme is always
"Anything Mixed Media Goes"
We have opportunities to be a Guest Designer for all our winners.

I have not been in the mood to do any crafting lately but I did want to sort out a photo frame to display a picture of my beloved brother. This is the result.

I wanted something in masculine colours but couldn't find anything in the shops I liked.


Then, my wonderful friend Pam sent me a beautiful glass butterfly in memory of my brother and that became my inspiration for this frame. Thank you Pam!


I started with a plain white wooden frame. The frame measures 6"x 8" (15 x 20cms). I deliberately crinkled strips of tissue paper and stuck it onto the frame with matt Mod Podge to create texture. Then I painted it all with DecoArt Dark Chocolate acrylic. Once dry, I gave it a coat of Weathered Wood and applied a top coat of grey acrylic to create the crackle.


I created the butterflies from clear resin. I used Prima's Mecha Moth and Artyco Crafts Steampunk Butterflies moulds. 


To colour the butterflies I added some sprinkles of Ultra Marine, Turquoise and White Brushos to the moulds before pouring the resin. When they were dry I coated the backs of the butterflies with a white Posca pen.


I shaped the wings before the resin had completely set to give more dimension around the frame. I attached the butterflies with Prima's Heavy Body Gel.


Now I have a lovely frame to display my treasured photo alongside the beautiful glass butterfly.

It's now your turn to have fun and create your mixed media projects. You can enter our challenge as many times as you like. A full list of the rules is on the challenge blog. For more inspiration please visit the Creative Artiste Challenge Blog to see the fabulous mixed media projects created by our multi talented team.
Remember to have fun crafting and enter your "Anything Mixed Media Goes" creations in our 
October challenge. 

I have entered this project in the following challenge:


Friday, 1 September 2023

Creative Artiste #97 September 2023

Already September and the little princess will be back at school next week. To say we've had a disastrous summer is an understatement. Following a phone call to say my wonderful brother had had a suspected stroke at the end of June, I headed 300 miles away from home to be with him. It ended with him passing away from a cancerous brain tumor last week. All so shockingly sudden! I've hardly seen the little princess this summer, but I did make it back home to celebrate her birthday at the weekend. It was a much needed relief to do something happy after our family tragedy.

And now, to keep moving forward .... 

 ....Welcome to a new challenge at

Creative Artiste is a monthly challenge blog for everyone who likes to mix their media. So, as long as you like to use various mediums on your creations, we'd love to see you enter the challenge.
A big Thank You to everyone who entered the challenge last month. Your projects were all wonderful and our winners have been announced on the blog.
Our theme is always
"Anything Mixed Media Goes"
We have opportunities to be a Guest Designer for all our winners.

Due to the very upsetting couple of months I've had,  I haven't really had time to craft, but, I did manage to finish off a project I started at a Tando Creative Ministry of Mixology craft retreat in April 2017. This was started in a class with Kate Crane. The class involved a Divided Box, some tags and embellishments. The products are still available on the Tando Creative website.

The large square tag measures just under 6" (15cms) and is made from thick greyboard. It was supplied with the Tags Kit. I started with a thick coat of white gesso
*All the bits and pieces received a coat of white gesso to start with.*


I then used a Brayer to add the colours, starting with the lighter ones and finishing with black gesso around the edges. I used DecoArt fluid acrylics Cobalt Teal, Transparent Yellow Iron Oxide and Green Gold. I sometimes diluted the colours with white gesso to get lighter shades. Finally, I stamped some text randomly over the tag and splattered with a white Posca pen.


The whimsical houses were from the Embellishment kit. I started this one with DecoArt Vermilion Fluid Acrylic. I then used DecoArt Weathered Wood Crackle medium before adding a top layer of Cobalt Teal. I used my fingers to paint the smaller bits with Green Gold and ran a black Copic pen around the edges before sticking them on the tag with PVA glue.


I used the crackle step on the roof for the second house and finger painted the window and door with Cobalt Teal Hue and white gesso. The tree was hand cut from extra greyboard. I used Transparent Yellow Iron Oxide and Green Gold, then finger added some dabs of Quinacridone Gold. I edged all the pieces with a black Posca pen before adding them to the tag.


The cloud was hand cut from leftover thick greyboard. I painted it with Cobalt Teal Hue and finger added white gesso. Again I edged it with black before sticking in place.


Last was the arrow. It was part of one of the Tando Kits from that day and left all by itself in the box. I painted it with Cobalt Turquoise Hue and added dabs of Quinacridone Gold before adding the black edges and sticking it down. I randomly added some dots to the tag with a black Posca Pen to finish.

Now it's your turn to have fun and create your mixed media projects. You can enter our challenge as many times as you like. A full list of the rules is on the challenge blog. For more inspiration please visit the Creative Artiste Challenge Blog to see the fabulous mixed media projects created by our multi talented team.
And meet a new team member!
Remember to have fun crafting and enter your "Anything Mixed Media Goes" creations in our 
September challenge. 

I have entered this project in the following challenges:

Friday, 4 August 2023

Creative Artiste #96 August 2023

....Welcome to a new challenge at

Creative Artiste is a monthly challenge blog for everyone who likes to mix their media. So, as long as you like to use various mediums on your creations, we'd love to see you enter the challenge.
A big Thank You to everyone who entered the challenge last month. Your projects were all wonderful and our winners have been announced on the blog.
Our theme is always
"Anything Mixed Media Goes"
We have opportunities to be a Guest Designer for all our winners.

I have created something a bit different for this month's inspiration. This is a 'Book Nook'. It's a small scene designed to nestle in a bookcase.
And as one of my daughters has always been obsessed with miniatures and books, this seemed like a perfect gift to make for her birthday.

The Book Nook was made from a kit designed and sold by CoolKatzcraft. The kit comes with all the panels and pieces in precision cut MDF. Also included is a mini LED lightbulb.
I assembled all the pieces and glued them into place - apart from a small removable section which gives access to the mini LED light positioned above the reading bench. 
The kit is called the Book Nook Intrigue Window Reading Nook and measures approx 6"x3" (15 x 7 .5cm) when assembled.

 I used a Tim Holtz brick stencil with some texture paste on the outside walls. Once dried, I painted the gaps between the bricks with DecoArt Fluid Acrylic Titan Buff. I then repositioned the stencil to protect the gaps whilst I painted the brickwork with DecoArt Fluid Acrylics in Quinacridone Gold, Yellow Iron Oxide and Diarylide Yellow.


I then turned to the inside and patiently used  DecoArt Acrylics in Grey Sky and Sunny Day to paint the walls, floor, window frame and shelves. I also printed a small photo of our local Pembroke Castle to use as the view through the window. I painted curtains on a piece of card and stuck that on the back of the photo and  mounted them behind the window frame with a piece of acrylic from the kit.


I made the bench cushion seat by covering a small piece of foam with felt and stitched some scatter cushions from felt. The small table was made with paper clay, painted in Yellow Iron Oxide acrylic, and an old bottle top. The slice of cake and plate are also made from paper clay.


I sourced miniature decorations from my stash, including a clock, cup and saucer, binoculars, jars, a wicker heart and a trumpet. I glued them all in place. I made the fruit bowl with apples and the basket of oranges from paper clay and painted them using fluid acrylics.


I had the most fun creating the tiny books. There are 75 of them and they are all less than 1" (2 .5cm) high. There are two sizes - paperbacks and hardback/albums. Some have paper pages, some are thick card and some are blocks of MDF supplied in the kit. The covers are either patterned papers I've die-cut or card I'd painted before die-cutting. CoolKatz sell the dies to create the book covers and pages.

Now it's your turn to have fun and create your mixed media projects. You can enter our challenge as many times as you like. A full list of the rules is on the challenge blog. For more inspiration please visit the Creative Artiste Challenge Blog to see the fabulous mixed media projects created by our multi talented team.
Remember to have fun crafting and enter your "Anything Mixed Media Goes" creations in our 
August challenge. 

I have entered this project in the following challenges:

Tuesday, 1 August 2023

Crafts Galore Encore August 2023

 There is a new challenge starting today at

Thank you to everyone who joined in with last month's challenge. The winners have been announced on the challenge blog. This is a month long challenge and you can enter up to three times. There is a full list of rules on the challenge blog.

Our theme every month is the popular
"Anything Goes"
and our sponsor this month is:

Who are offering the 3 digi images the DT have used to the lucky winner.

I have made a birthday card for our little princess to show you. The card is 5" x 7" (12 .5 x 18cms).

I layered two pieces of Papermania card in different shades of purple and then added a pretty paper from an old LOTV 8" paper pad.


I used the Wood Anemone Flower Pot image and coloured it with my Copics. I layered the image onto a piece of pale purple card and then cut a second mat from the same card and layered it with a piece of floral paper from the LOTV pad.


I created the sentiment strips on my computer. I added all the toppers to the card and finished off with two bows.

Now please visit the  Crafts Galore Encore challenge blog where you can see the wonderful projects and cards created by our talented team using Colour of Love images.
Grab some inspiration while you're there and enter your "Anything Goes" creations in this month's challenge.

I have entered this card in the following challenges:

Friday, 7 July 2023

Creative Artiste #95 July 2023

 What a change in the weather this week! Not exactly a warm sunny greeting for July. I do hope it improves as we have some nice plans for this month and none of them feature umbrellas and wellies! 

 ....Welcome to a new challenge at

Creative Artiste is a monthly challenge blog for everyone who likes to mix their media. So, as long as you like to use various mediums on your creations, we'd love to see you enter the challenge.
A big Thank You to everyone who entered the challenge last month. Your projects were all fabulous and our winners have been announced on the blog.
Our theme is always
"Anything Mixed Media Goes"
We have opportunities to be a Guest Designer for all our winners.


I am back with my favourite blues. And, again, on a hexagonal canvas. The canvas measures 10" (26.5cm) across.

I started by giving the canvas a coat of white gesso. I then used watered DecoArt Fluid Acrylics in Cobalt Teal Hue and Cobalt Turquoise Hue. I let the paint run down the sides of the canvas too.


Once dry, I added some random stamping with some old Docrafts hexagonal stamps in Memento Paris Dusk and then some texture paste through a Dutch Doobadoo hexagonal stencil.


I cut six hexagons from greyboard and gave them a coat of white gesso. I coloured them in graduated shades of blue using DecoArt Fluid Acrylic Prussian Blue, Decoart Acrylic Baby Blue and white acrylic paint


I used Distress Oxide Salvaged Patina to stamp each hexagon with part of Aall & Create stamp #206 and heat embossed with clear WOW! powder to set. I mounted the hexagons on the canvas using platforms of greyboard underneath them with Heavy Body Gel so they are raised up and level.


I finished the canvas with a Bee Crafty word stamp in Memento Paris Dusk on turquoise card and heat embossed it with several layers of clear WOW! powder for a glossy look.

Now it's your turn to have fun and create your mixed media projects. You can enter our challenge as many times as you like. A full list of the rules is on the challenge blog. For more inspiration please visit the Creative Artiste Challenge Blog to see the fabulous mixed media projects created by our multi talented team.
Remember to have fun crafting and enter your "Anything Mixed Media Goes" creations in our 
July challenge. 

I have entered this project in the following challenges:

Saturday, 1 July 2023

Crafts Galore Encore July 2023

June proved to be a very busy month with trips away and making the most of the beautiful summer weather with local activities. I'm hoping July's weather will be equally as nice and I'll be looking for outdoor things to keep us amused.

Meanwhile .....

.... there is a new challenge starting today at

Thank you to everyone who joined in with last month's challenge. The winners have been announced on the challenge blog. This is a month long challenge and you can enter up to three times. There is a full list of rules on the challenge blog.

Our theme every month is the popular
"Anything Goes"
and our sponsor this month is:

who are offering a $10 Aus store voucher for our lucky winner.


I have made an A5 card to show you.
I used one of the free images available on Beccy's Place Blog. The image comes with a free paper which I did not use.

I layered an A4 piece of black card with a beautiful paper from G45 Elegance 12" papers.


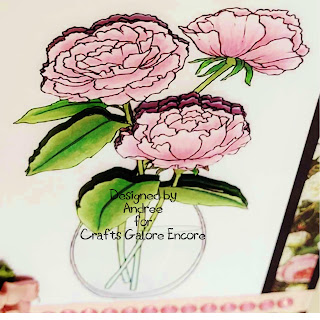
I used the Peonies in Vase image and printed it out 3 times. I coloured the images with my Copics and cut two of the flowers and some of the leaves so I could decoupage them with foam pads.


I printed the base image with a Happy Birthday sentiment. I layered this onto black card and fixed it to the G45 paper and black card before adding the decoupaged elements. I wrapped a silk ribbon across the card front and fixed the black card onto the A5 card blank.


I finished the card with some pink gems and flowers.

Now please visit the  Crafts Galore Encore challenge blog where you can see the wonderful projects and cards created by our talented team using Beccy's Place images.
Grab some inspiration while you're there and enter your "Anything Goes" creations in this month's challenge.

I have entered this card in the following challenges: