Easter Bliss

Showing posts with label DecoArt Fluid Acrylic. Show all posts

Friday, 7 March 2025

Creative Artiste #113 March 2024

 March has started nicely, the temperatures are improving, the sun has been shining and we have been making some nice plans for later in the year. Exciting times ahead ....

.... Meanwhile ....

....Welcome to a new challenge at

Creative Artiste is a monthly challenge blog for everyone who likes to mix their media. So, as long as you like to use various mediums on your creations, we'd love to see you enter the challenge.
A big Thank You to everyone who entered the challenge last month. Your projects were all fabulous and our winners have been announced on the blog.
Our theme is always
"Anything Mixed Media Goes"
We have opportunities to be a Guest Designer for all our winners.

I have finally finished a project I started a couple of years ago. Sometimes the creative process takes time.
I'd cut out and painted the porthole grey then set it aside. It took me a while to decide which creative direction to take. Once I saw these amazing 'Steampunk' fish last month I finally knew what I wanted to make. 
I've titled this project 
"A view from the shipwreck".


The porthole measures 12" (30 cm) across and is cut from thick greyboard. It's mounted onto a circular canvas board.


I had originally painted the porthole in black gesso. I had added a coat of grey acrylic and wiped some off with  a baby wipe before it dried to give a patchy look. Then I set it aside.
In the second phase I painted the porthole with DecoArt Quinacridone Gold Fluid Acrylic mixed with water. The bolts are from an old set by Tando Creative.


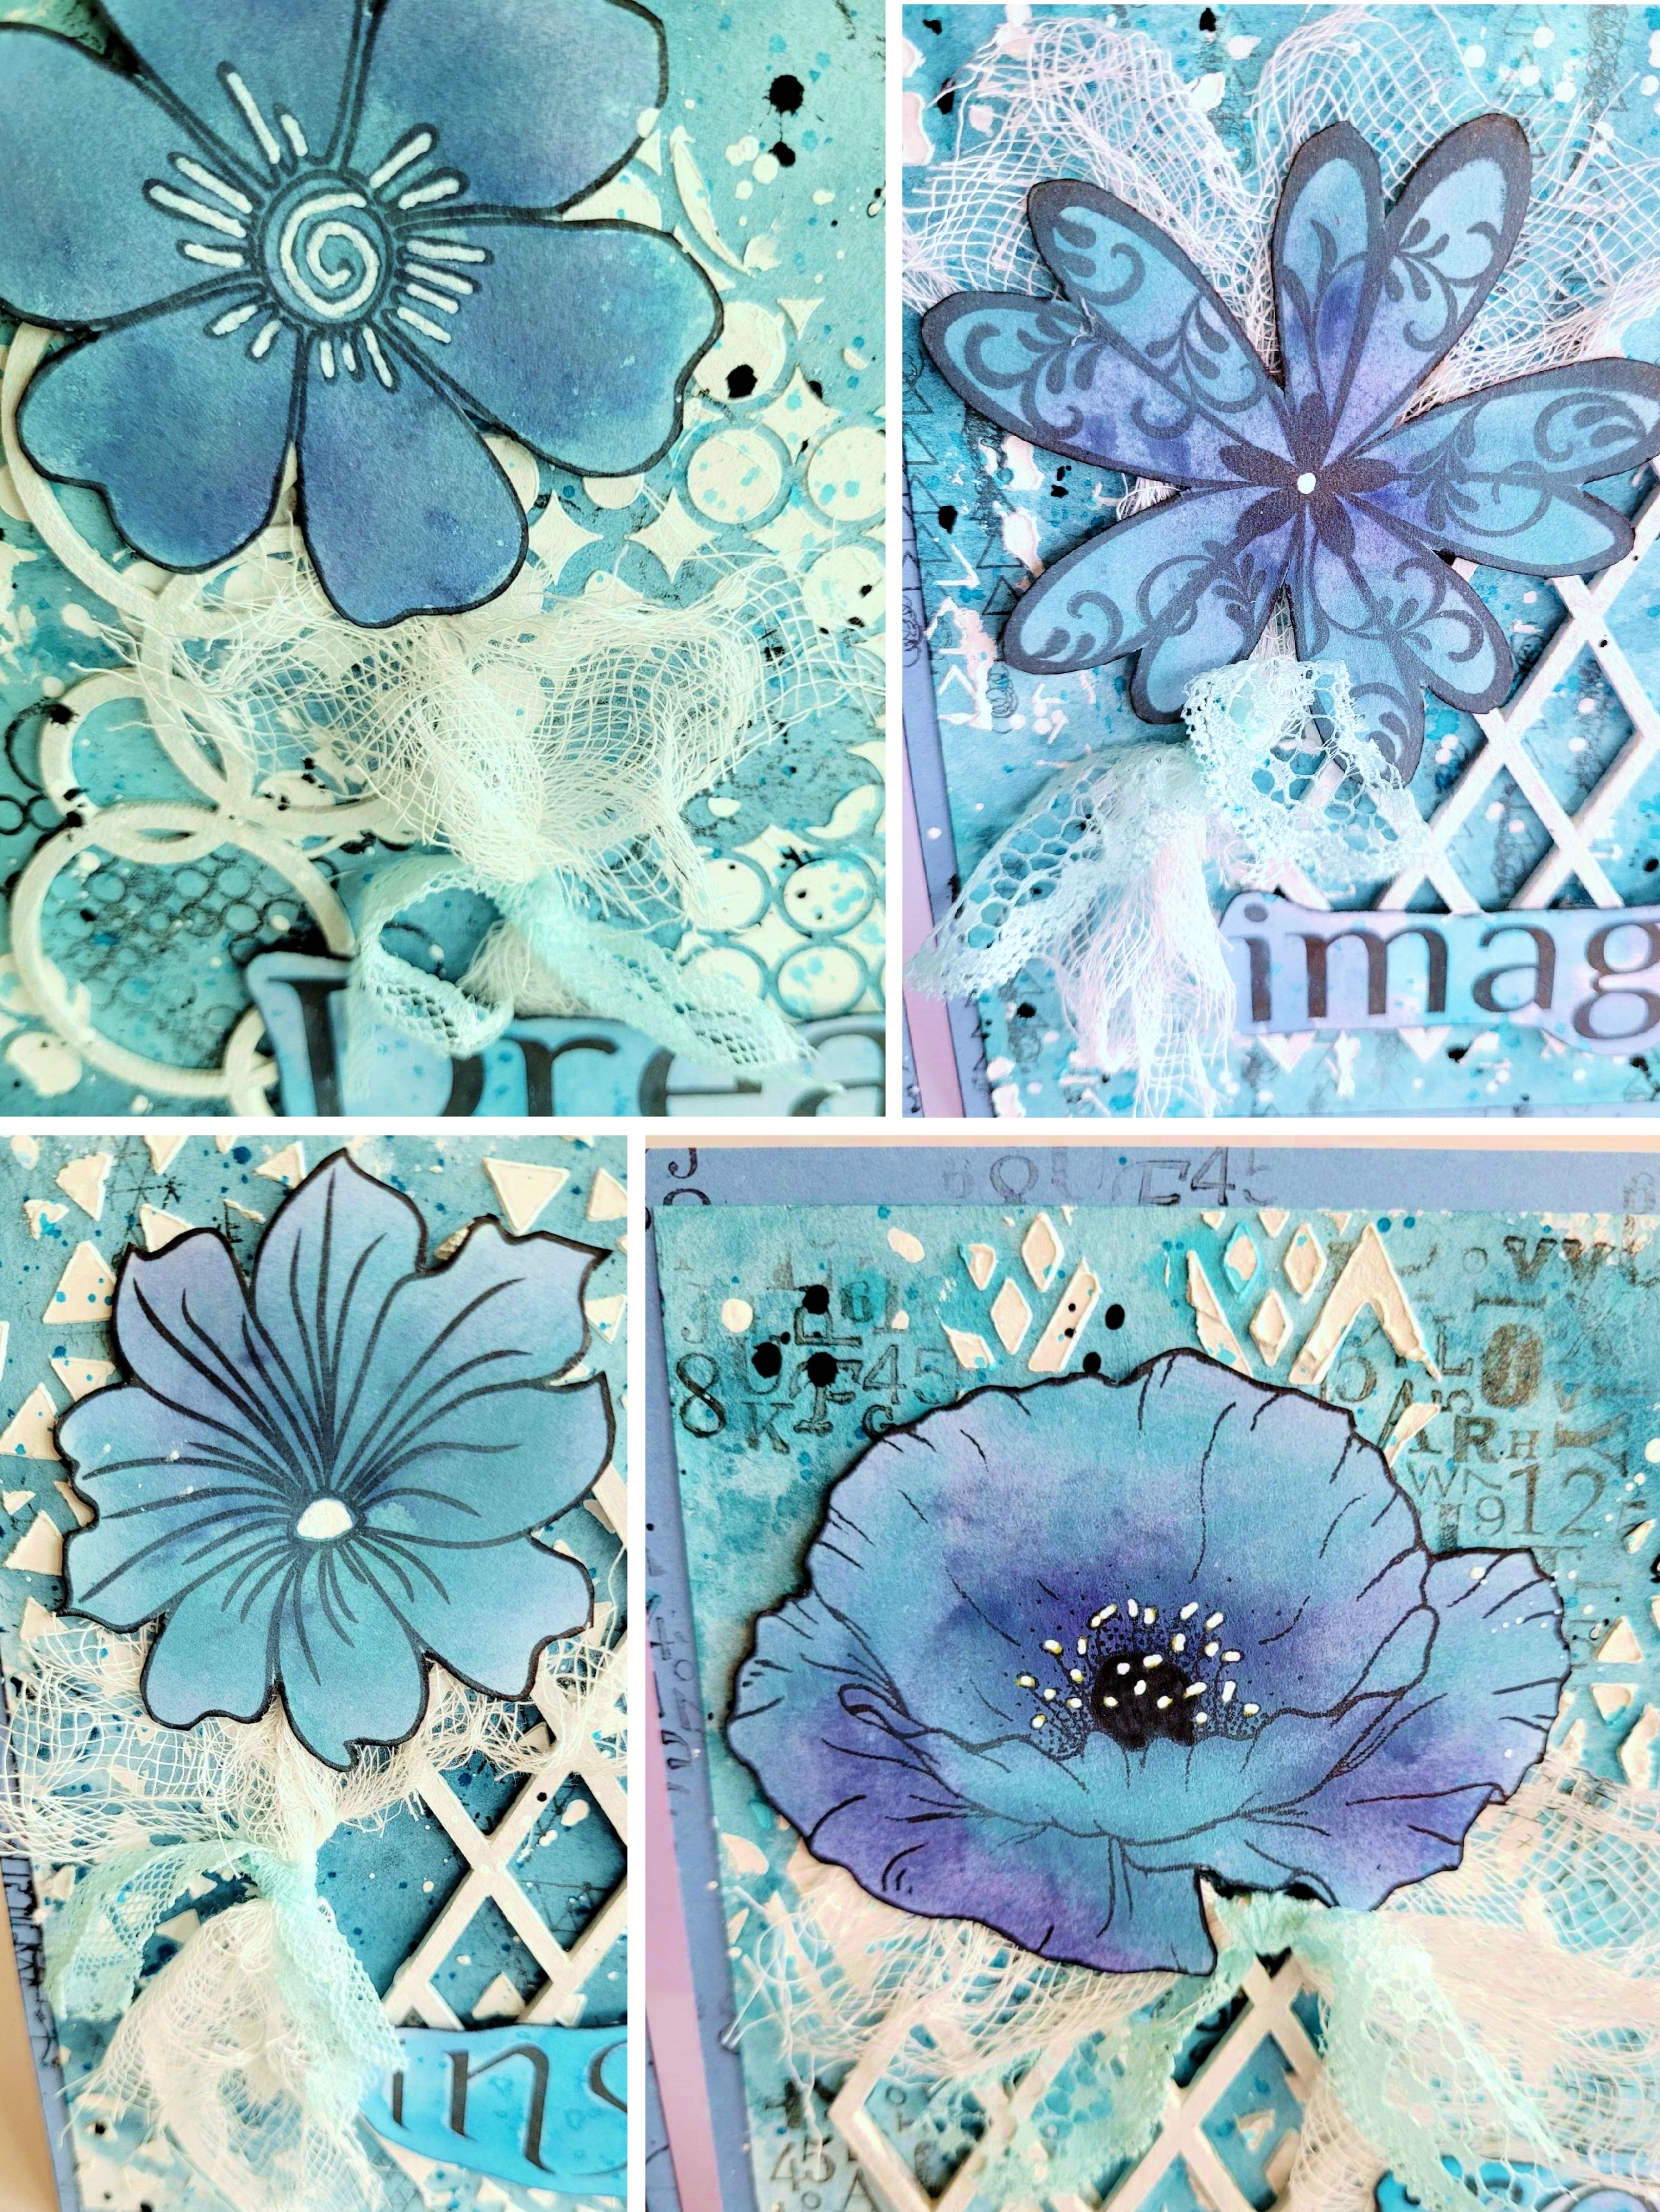
1. I gave the canvas a coat of heavy white gesso and used Brushos in Ultra Marine, Turquoise and Sea Green sprayed with water to colour it.
2. I got these fantastic fish from Creative Fabrica and printed them out in different sizes, then fussy cut them. I gave them a coat of Prima's 3D Matte Gel on the front and back to strengthen them. 
3. The die cut ferns are Sizzix Thinlets Holiday Greens set. I coloured them with Emerald and Leaf Brushos.
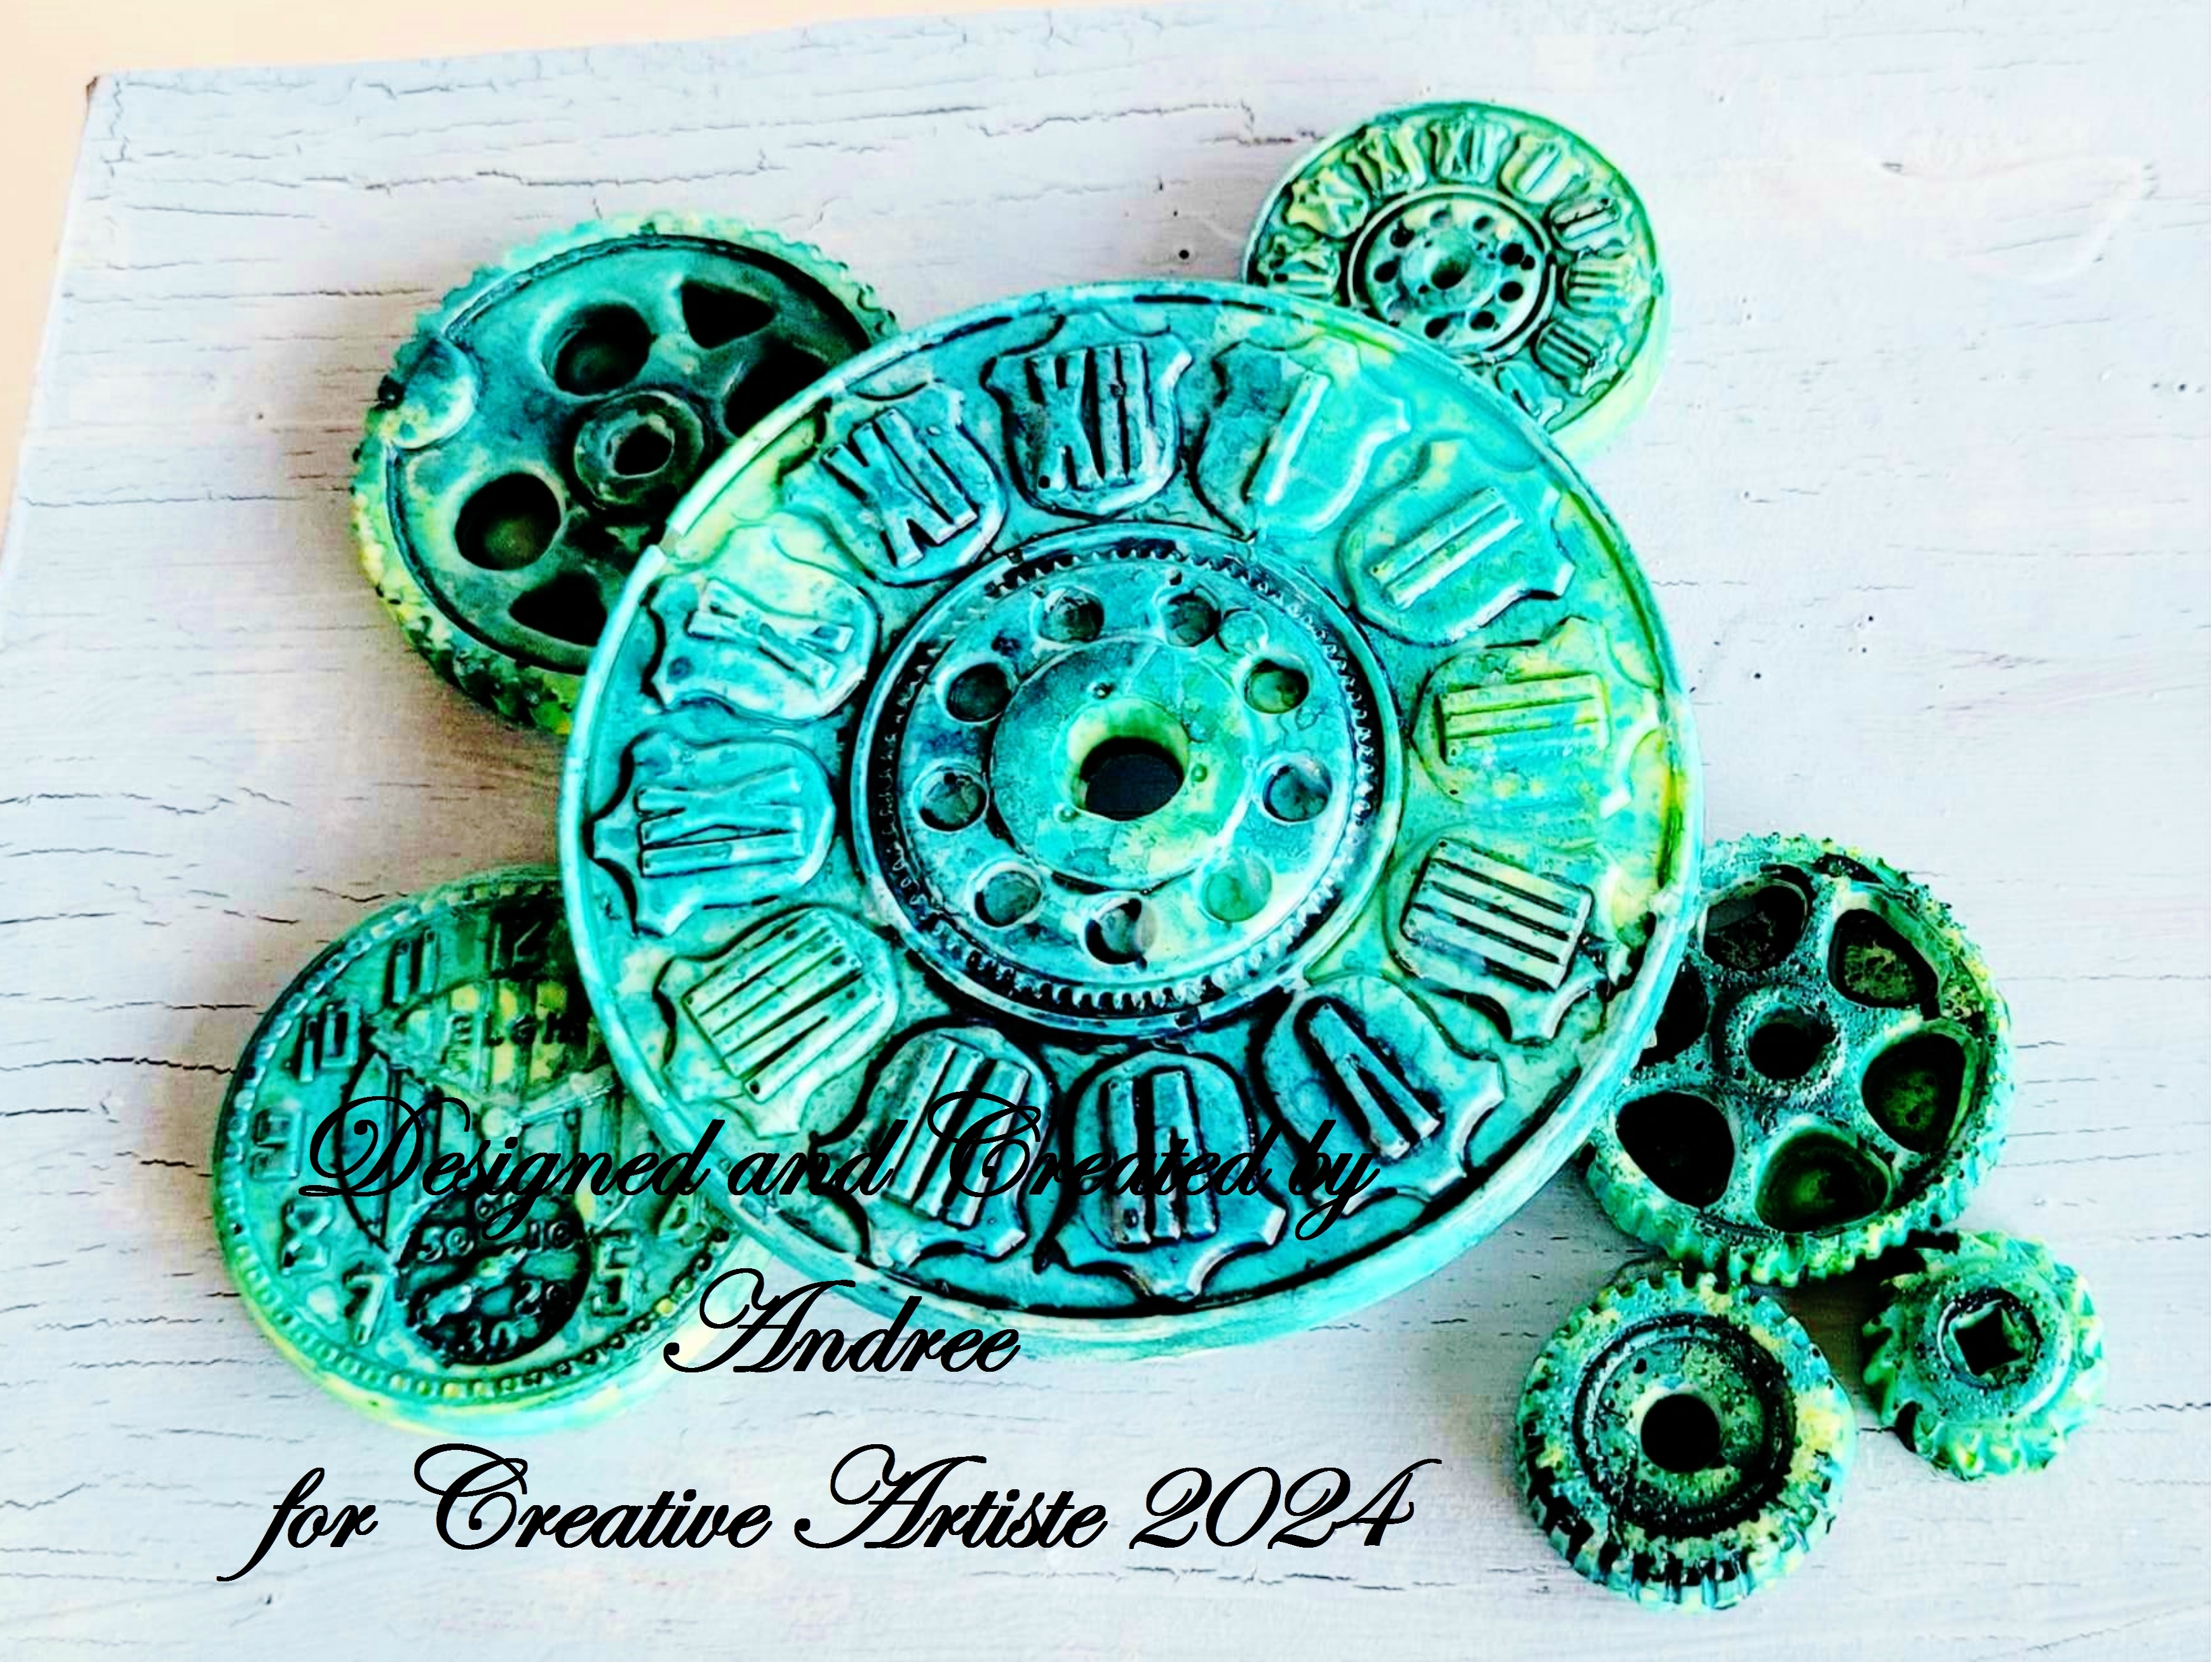
4. The cogs (gears) are MDF from Samantha K. I bought a huge bag and these are just a few. 
I used Cadence Createx Rust Effect Paint and Powder to add the rusty colour and texture.


I fixed the cogs to the porthole with Prima's 3D Matte Gel and finished them with some Cadence Antique Powder paint in turquoise. I also painted the bolts and some patches around the porthole edges.


I added the ferns to the canvas with the matt gel, only gluing at the bases.


I mounted some of the fish onto greyboard blocks to give them dimension and tucked them in amongst the ferns.


I finished by fixing the porthole to the canvas with the 3D Matt Gel and adding some glass cabochons as bubbles.

Now it's your turn to have fun and create your mixed media projects. You can enter our challenge as many times as you like. A full list of the rules is on the challenge blog. For more inspiration please visit the Creative Artiste Challenge Blog to see the fabulous mixed media projects created by our multi talented team.
Remember to have fun crafting and enter your "Anything Mixed Media Goes" creations in our 
March challenge. 

I have entered this project in the following challenges:

Friday, 6 December 2024

Creative Artiste #111 December 2024

  ....Welcome to a new challenge at

Creative Artiste is a monthly challenge blog for everyone who likes to mix their media. So, as long as you like to use various mediums on your creations, we'd love to see you enter the challenge.
A big Thank You to everyone who entered the challenge last month. Your projects were all wonderful and our winners have been announced on the blog.
Our theme is always
"Anything Mixed Media Goes"
We have opportunities to be a Guest Designer for all our winners.


I've made a festive wreath to show you.

The base of the wreath is a 7.5" (19cm) wooden embroidery hoop. I made all the snowflakes using a Stamperia snowflake mould with Hearty Soft Paper clay.


I prepped all the pieces before assembling the wreath.
I first gave the hoop and the snowflakes a coat of white gesso. Once dry I diluted some DecoArt Prussian Blue Fluid Acrylic with plenty of water and painted the hoop and snowflakes. 
The next step was to cover the hoop with DecoArt Crackle Paste and let it dry.


I then wrapped a battery powered string of little lights around the hoop.
Finally, I painted the snowflakes with DecoArt Glamour Dust and sprinkled them with a fine white glitter while they were still wet so the glitter would stick. I added some silver Tim Holtz metallic droplets to the centres of the snowflakes.


I arranged the snowflakes around the hoop and glued them in place with Heavy Body Gel, overlapping them to cover the hoop and lights.


I arranged some plastic pine branches, some mini pine cones and a few little metal bells on one side of the hoop and fixed them with Heavy Body Gel. I tied a bow with wide white ribbon and added some more of the branches, bells and a cone to cover where the battery pack for the lights is attached.


I finished by tying a ribbon onto the hoop to be able to hang it up. 
The wreath looks so pretty when it's lit up from the back.

Now it's your turn to have fun and create your mixed media projects. You can enter our challenge as many times as you like. A full list of the rules is on the challenge blog. For more inspiration please visit the Creative Artiste Challenge Blog to see the fabulous mixed media projects created by our multi talented team.
Remember to have fun crafting and enter your "Anything Mixed Media Goes" creations in our 
December challenge. 

It remains for me to wish a fun festive season to you all, however you celebrate!

I have entered this project in the following challenges:


Friday, 5 July 2024

Creative Artiste #106 July 2024

  ....Welcome to a new challenge at

Creative Artiste is a monthly challenge blog for everyone who likes to mix their media. So, as long as you like to use various mediums on your creations, we'd love to see you enter the challenge.
A big Thank You to everyone who entered the challenge last month. Your projects were all wonderful and our winners have been announced on the blog.
Our theme is always
"Anything Mixed Media Goes"
We have opportunities to be a Guest Designer for all our winners.


I have made a tag.  It measures 7"x 4" (18 x 19 cm). The tag, cogs and clock are all made of thick greyboard and are from Tando Creative

I started by giving the tag a coat of white gesso and then adding texture paste though the Diamond Life stencil #70 from Aall and Create


I painted the cogs and frame with brown acrylics and finished them with touches of gold acrylic. I set them aside to dry.


I painted the tag with DecoArt Fluid Acrylics Prussian Blue Hue and Cobalt Turquoise Hue, also Golden Teal Fluid Acrylic. I used a lot of water to move the paints around and blend them.


I added touches of white acrylic and gold acrylic and sprayed them with water to blend them into the blues.


I used dabs of the Golden Teal acrylic and DecoArt Prussian Blue with white acrylic paint to colour the clock. I finished it with some gold acrylic. The padlock was painted with gold acrylic.


I assembled all the elements, using Heavy Body Gel, starting with the lovely gold lace ribbon. 


Then I add the cogs, clock, frame and padlock.


Now it's your turn to have fun and create your mixed media projects. You can enter our challenge as many times as you like. A full list of the rules is on the challenge blog. For more inspiration please visit the Creative Artiste Challenge Blog to see the fabulous mixed media projects created by our multi talented team.
Remember to have fun crafting and enter your "Anything Mixed Media Goes" creations in our 
July challenge. 

I have entered this project in the following challenges:


Friday, 5 April 2024

Creative Artiste #103 April 2024

 ....Welcome to a new challenge at

Creative Artiste is a monthly challenge blog for everyone who likes to mix their media. So, as long as you like to use various mediums on your creations, we'd love to see you enter the challenge.
A big Thank You to everyone who entered the challenge last month. Your projects were all wonderful and our winners have been announced on the blog.
Our theme is always
"Anything Mixed Media Goes"
We have opportunities to be a Guest Designer for all our winners.

Instead of making a sympathy card for some dear friends last Christmas I decided to make a small canvas instead.. I have made another, similar one, for my sister in honour of our much missed brother.

The canvas measures 7"x 5" (18 x 13 cm). I started by giving the canvas a coat of white gesso. I then splattered some watered down DecoArt Fluid Acrylics Cobalt Turquoise and Prussian Blue diagonally across the canvas.


I die-cut three feathers and lightly sprinkled them with Stampendous Frantage Shabby Blue Embossing Enamel. I heat embossed them by carefully heating the feathers from underneath until the powder started to melt before moving to heating from above.


I made a small resin heart and heat embossed it with the Shabby Blue enamel too. I then added a sprinkle of Stampendous Frantage Chunky Gold enamel to the heart and feathers and heat embossed them.


I sprinkled the canvas with the mix of Stampendous enamel powders and heat embossed it before tying the feathers together with a thin gold thread and adding them, along with the heart, to the canvas with soft matt gel.

Now it's your turn to have fun and create your mixed media projects. You can enter our challenge as many times as you like. A full list of the rules is on the challenge blog. For more inspiration please visit the Creative Artiste Challenge Blog to see the fabulous mixed media projects created by our multi talented team.
Remember to have fun crafting and enter your "Anything Mixed Media Goes" creations in our 
April challenge. 

I have entered this project in the following challenges:

Friday, 2 February 2024

Creative Artiste #101 February 2024

 ....Welcome to a new challenge at

Creative Artiste is a monthly challenge blog for everyone who likes to mix their media. So, as long as you like to use various mediums on your creations, we'd love to see you enter the challenge.
A big Thank You to everyone who entered our centenary challenge in December. Your projects were all wonderful and our winner and Top Three have been announced on the blog.

Our theme is always
"Anything Mixed Media Goes"
We have opportunities to be a Guest Designer for all our winners.


I have a made a memory box to store some precious photos and  mementos from my beloved brother.
 I've stuck with the theme of blue butterflies for him, to match the photo frame I made last year.


This project started out as an empty chocolate box measuring 10" x 7" x 3" (25 x 18 x 8cm) . I gave it a couple of coats of black acrylic paint before adding a layer of DecoArt Americana Weathered Wood Crackle Medium.


I then added a layer of DecoArt Americana Baby Blue acrylic paint and watched the crackles develop. Once that layer was set I dry brushed white gesso over the box to lighten some areas and add to the distressed look.


To decorate the box top I made some resin pieces using Prima's Clock Faces and Machine Parts moulds. I coloured them with DecoArt Fluid Acrylics in Cobalt Teal Hue, Cobalt Turquoise Hue, Prussian Blue Hue and Hansa Yellow Light with lots of water. I arranged them on the top of the box with Prima's Heavy Body Gel.


I used part of an old stamp for the word Remember. I stamped it with Memento Paris Dusk and sealed it with clear embossing powder before mounting onto blue and black card.


I lined the inside of the box using some butterfly paper napkins and glued them in place with Prima Soft Matt Gel. I added a couple of magnets to make a secure closure.


I finished the box by decorating it with some of the butterflies from the napkins and gave the whole box a coat of Prima Soft Matt Gel for protection.


Now it's your turn to have fun and create your mixed media projects. You can enter our challenge as many times as you like. A full list of the rules is on the challenge blog. For more inspiration please visit the Creative Artiste Challenge Blog to see the fabulous mixed media projects created by our multi talented team.
Remember to have fun crafting and enter your "Anything Mixed Media Goes" creations in our 
February challenge. 

I have entered this project in the following challenges:

Friday, 4 August 2023

Creative Artiste #96 August 2023

....Welcome to a new challenge at

Creative Artiste is a monthly challenge blog for everyone who likes to mix their media. So, as long as you like to use various mediums on your creations, we'd love to see you enter the challenge.
A big Thank You to everyone who entered the challenge last month. Your projects were all wonderful and our winners have been announced on the blog.
Our theme is always
"Anything Mixed Media Goes"
We have opportunities to be a Guest Designer for all our winners.

I have created something a bit different for this month's inspiration. This is a 'Book Nook'. It's a small scene designed to nestle in a bookcase.
And as one of my daughters has always been obsessed with miniatures and books, this seemed like a perfect gift to make for her birthday.

The Book Nook was made from a kit designed and sold by CoolKatzcraft. The kit comes with all the panels and pieces in precision cut MDF. Also included is a mini LED lightbulb.
I assembled all the pieces and glued them into place - apart from a small removable section which gives access to the mini LED light positioned above the reading bench. 
The kit is called the Book Nook Intrigue Window Reading Nook and measures approx 6"x3" (15 x 7 .5cm) when assembled.

 I used a Tim Holtz brick stencil with some texture paste on the outside walls. Once dried, I painted the gaps between the bricks with DecoArt Fluid Acrylic Titan Buff. I then repositioned the stencil to protect the gaps whilst I painted the brickwork with DecoArt Fluid Acrylics in Quinacridone Gold, Yellow Iron Oxide and Diarylide Yellow.


I then turned to the inside and patiently used  DecoArt Acrylics in Grey Sky and Sunny Day to paint the walls, floor, window frame and shelves. I also printed a small photo of our local Pembroke Castle to use as the view through the window. I painted curtains on a piece of card and stuck that on the back of the photo and  mounted them behind the window frame with a piece of acrylic from the kit.


I made the bench cushion seat by covering a small piece of foam with felt and stitched some scatter cushions from felt. The small table was made with paper clay, painted in Yellow Iron Oxide acrylic, and an old bottle top. The slice of cake and plate are also made from paper clay.


I sourced miniature decorations from my stash, including a clock, cup and saucer, binoculars, jars, a wicker heart and a trumpet. I glued them all in place. I made the fruit bowl with apples and the basket of oranges from paper clay and painted them using fluid acrylics.


I had the most fun creating the tiny books. There are 75 of them and they are all less than 1" (2 .5cm) high. There are two sizes - paperbacks and hardback/albums. Some have paper pages, some are thick card and some are blocks of MDF supplied in the kit. The covers are either patterned papers I've die-cut or card I'd painted before die-cutting. CoolKatz sell the dies to create the book covers and pages.

Now it's your turn to have fun and create your mixed media projects. You can enter our challenge as many times as you like. A full list of the rules is on the challenge blog. For more inspiration please visit the Creative Artiste Challenge Blog to see the fabulous mixed media projects created by our multi talented team.
Remember to have fun crafting and enter your "Anything Mixed Media Goes" creations in our 
August challenge. 

I have entered this project in the following challenges:

Friday, 7 July 2023

Creative Artiste #95 July 2023

 What a change in the weather this week! Not exactly a warm sunny greeting for July. I do hope it improves as we have some nice plans for this month and none of them feature umbrellas and wellies! 

 ....Welcome to a new challenge at

Creative Artiste is a monthly challenge blog for everyone who likes to mix their media. So, as long as you like to use various mediums on your creations, we'd love to see you enter the challenge.
A big Thank You to everyone who entered the challenge last month. Your projects were all fabulous and our winners have been announced on the blog.
Our theme is always
"Anything Mixed Media Goes"
We have opportunities to be a Guest Designer for all our winners.


I am back with my favourite blues. And, again, on a hexagonal canvas. The canvas measures 10" (26.5cm) across.

I started by giving the canvas a coat of white gesso. I then used watered DecoArt Fluid Acrylics in Cobalt Teal Hue and Cobalt Turquoise Hue. I let the paint run down the sides of the canvas too.


Once dry, I added some random stamping with some old Docrafts hexagonal stamps in Memento Paris Dusk and then some texture paste through a Dutch Doobadoo hexagonal stencil.


I cut six hexagons from greyboard and gave them a coat of white gesso. I coloured them in graduated shades of blue using DecoArt Fluid Acrylic Prussian Blue, Decoart Acrylic Baby Blue and white acrylic paint


I used Distress Oxide Salvaged Patina to stamp each hexagon with part of Aall & Create stamp #206 and heat embossed with clear WOW! powder to set. I mounted the hexagons on the canvas using platforms of greyboard underneath them with Heavy Body Gel so they are raised up and level.


I finished the canvas with a Bee Crafty word stamp in Memento Paris Dusk on turquoise card and heat embossed it with several layers of clear WOW! powder for a glossy look.

Now it's your turn to have fun and create your mixed media projects. You can enter our challenge as many times as you like. A full list of the rules is on the challenge blog. For more inspiration please visit the Creative Artiste Challenge Blog to see the fabulous mixed media projects created by our multi talented team.
Remember to have fun crafting and enter your "Anything Mixed Media Goes" creations in our 
July challenge. 

I have entered this project in the following challenges:

Friday, 5 May 2023

Creative Artiste #93 May 2023

 Another Bank Holiday weekend in Britain! This time for the King's Coronation. It gives us another chance for a family visit and celebration. It's certainly been a wonderful Spring so far with all the family gatherings we are able to have. They might have seriously cut into my crafting time but I do love being able to spend quality time with my family.

So, before the weekend starts ....

 ....Welcome to a new challenge at

Creative Artiste is a monthly challenge blog for everyone who likes to mix their media. So, as long as you like to use various mediums on your creations, we'd love to see you enter the challenge.
A big Thank You to everyone who entered the challenge last month. Your projects were all fabulous and our winners have been announced on the blog.
Our theme is always
"Anything Mixed Media Goes"
We have opportunities to be a Guest Designer for all our winners.


I have made a set of four mixed media cards this month. I can leave them like this or add a sentiment to them when I decide to use them.

It's a lot of fun - and very messy - making mixed media cards so I like to make a few of them at a time. That way I can stick to using the same mediums and similar products for every stage.


I started these cards by blending DecoArt Fluid Acrylics Cobalt Turquoise Hue and Prussian Blue Hue with water on 6" (15cm) squares of mixed media card. Once dried I used a 3rd generation stamp technique randomly on the card squares with some Aall & Create stamps.


I then used texture paste through some Aall & Create stencils on each piece and added some more colour by spattering Mermaid Lagoon Distress Ink. I also splattered the squares with black and white Posca pens.


I coloured some stamped flowers firstly with watered Chipped Sapphire Distress Ink then with Broken China Distress Oxide and water and cut them out. I added touches of  White Posca pen to details on each flower and edged each one with black pen.


I stamped some words and cut them out. They were coloured with watered Distress Oxide Faded Jeans and then Distress Ink Mermaid Lagoon with water. I ran a black pen around the edges to add definition.


I assembled the card fronts with some painted Tando Creative greyboard pieces and added some cheesecloth twists I'd tied with strips of turquoise lace. Then the flowers and words were fixed in place using a combination of foam pads and Soft Matt Gel.
I coloured four card blank edges with Faded Jeans Distress Oxide, randomly added stamping and black Posca splats before fixing the Mixed Media panels in place with Soft Matt Gel.

Now it's your turn to have fun and create your mixed media projects. You can enter our challenge as many times as you like. A full list of the rules is on the challenge blog. For more inspiration please visit the Creative Artiste Challenge Blog to see the wonderful mixed media projects created by our multi talented team.
Remember to have fun crafting and enter your "Anything Mixed Media Goes" creations in our 
May challenge. 

I have entered this card set in the following challenges:

Friday, 3 February 2023

Creative Artiste #90 February 2023

The Creative Artiste team has been taking a break during January to recharge their creativity.

But now we are back!

So, 

 ....Welcome to the first challenge of 2023 at

Creative Artiste is a monthly challenge blog for everyone who likes to mix their media. So, as long as you like to use various mediums on your creations, we'd love to see you enter the challenge.
A big Thank You to everyone who entered the challenge in December. Your projects were all fabulous and our winners have been announced on the blog.
Our theme is always
"Anything Mixed Media Goes"
We have opportunities to be a Guest Designer for all our winners.

Normally I don't like flying insects. Actually, I don't much like insects at all, but I kept finding myself attracted to these rather fabulous looking moths and finally treated myself to them for Christmas. I have showcased them on a canvas and called it
"Time to Fly"

I made the moths, cogs and clocks from resin using Prima moulds. They are Mecha Moth, Clock Faces, and Machine Parts.
I used texture paste through a Tim Holtz star stencil randomly over the canvas then painted it with DecoArt acrylic paints in shades of blue.

Before fixing to the canvas, I painted the moths using DecoArt acrylic paints. Whilst the paint was still wet I sprinkled gold gilding flakes on the wings and dabbed them in place. I sealed the wings with Matt Mod Podge once dry.

 I assembled the resin elements - except the moths -  with Prima's Heavy Body Gel onto the canvas. Once dry I painted the elements with White and Baby Blue acrylic paints. I then added touches of DecoArt Prussian Blue Fluid acrylic paint, allowing it to run onto the canvas around the arrangement.

Lastly, I added the three moths and dry brushed all the elements and areas of the canvas with gold acrylic paint.

Now it's your turn to have fun and create your mixed media projects. You can enter our challenge as many times as you like. A full list of the rules is on the challenge blog. For more inspiration please visit the Creative Artiste Challenge Blog to see the fabulous mixed media projects created by our multi talented team.
Remember to have fun crafting and enter your "Anything Mixed Media Goes" creations in our 
February challenge. 

I have entered this project in the following challenges: