Showing posts with label Tim Holtz stencil. Show all posts

Friday, 3 July 2026

Creative Artiste #127 July 2026

This weekend I'm attending a crafty weekend retreat where I'll be taking classes with three awesome mixed media artists. Finnabair, Olga Heldwein and Nuneka. I love to learn new techniques, work with new products and craft alongside likeminded crafters.

But, before I head off ....

 ....Welcome to a new challenge at

Creative Artiste is a monthly challenge blog for everyone who likes to mix their media. So, as long as you like to use various mediums on your creations, we'd love to see you enter the challenge.
A big Thank You to everyone who entered the challenge last month. Your projects were all wonderful and our winners have been announced on the blog.
Our theme is always
"Anything Mixed Media Goes"
We have opportunities to be a Guest Designer for all our winners.

I found a gorgeous tea spoon at a car boot sale and couldn't wait to use it in a mixed media project. It's a gold, engraved spoon with Mother of Pearl on the handle.

The canvas board base measures 9"x 7" (23x 18cms)

I started by making the flowers.
1. I wiped a sheet of mixed media paper with Distress Oxides Picked Raspberry and Wilted Violet.
2. I spritzed the paper with water so the inks blended.
3. Once dry, I cut the flowers using Spellbinder dies.
4. I assembled the flowers with PVA glue and curved them to give them some dimension.


5. I coloured the edges of the canvas with Lucky Clover Distress Oxide and water.
6. I glued some torn floral papers to the canvas with Prima Soft Matt Gel.
7. I passed DecoArt Crackle Paste through a Tim Holtz stencil and left it to dry, and crackle.
8. I spattered DecoArt Baby Pink acrylic paint over the canvas. I also used the paint to colour some bottle tops and glass beads.


I stamped a couple of tea cups with Heartfelt Creations China Fragments stamps on watercolour paper. I then die cut them with the matching Spellbinders Nested Tea Cups dies. I lightly coloured the cups with Distress Oxide Worn Lipstick.


I coloured some seam binding with Worn Lipstick Distress Oxide and made it into a bow with some cotton lace. I tied the double bow to the handle of the spoon and fixed the teaspoon to the canvas with Prima 3D Matt Gel.


I added the tea cups to the canvas with the help of some foam pads.


The flowers, fabric leaves, bottle tops and glass beads were added with Prima 3D Matt Gel.
I filled in some gaps with Prima Mini Artstones and finished by adding some pearls to a few of the flower centres.

Now I can display my pretty teaspoon instead of hiding it in the cutlery drawer.
This canvas is number 5 of a theme I have made called Tea for One.

Now it's your turn to have fun and create your mixed media projects. You can enter our challenge as many times as you like. A full list of the rules is on the challenge blog. For more inspiration please visit the Creative Artiste Challenge Blog to see the fabulous mixed media projects created by our multi talented team.
Remember to have fun crafting and enter your "Anything Mixed Media Goes" creations in our 
July challenge. 

I have entered this project in the following challenges:

Friday, 3 October 2025

Creative Artiste #120 October 2025

  Happy Friday....

....Welcome to a new challenge at

Creative Artiste is a monthly challenge blog for everyone who likes to mix their media. So, as long as you like to use various mediums on your creations, we'd love to see you enter the challenge.
A big Thank You to everyone who entered the challenge last month. Your projects were all wonderful and our winners have been announced on the blog.
Our theme is always
"Anything Mixed Media Goes"
We have opportunities to be a Guest Designer for all our winners.


The leaves are changing colour and spilling from the trees. I took inspiration from the rich, warm colours to create this little canvas. 

The canvas board measures 7"x 5" (18 x 13 cms). And I used one of my favourite techniques to create the Autumnal background.


1. I started by scribbling wax crayons on the canvas to give an ombre effect.
2. I then used my heat tool to melt the wax, rubbing it with a tissue to blend the colours together.
3. I used texture paste and a Tim Holtz stencil to add the flowers.
4. I created the leaf colours with Brushos and water.


I used the old Stamping Up set French Foliage to stamp the larger leaves and fussy cut them. The three smaller leaves in the front are die cut using an old Docrafts Dinky die.


I glued the arrangement of leaves onto the canvas with Prima 3D Matt Gel to give dimension and added  some rusty wire behind the leaves.

The sentiment is a Chocolate Baroque stamp on card I'd coloured with Brushos.


Now it's your turn to have fun and create your mixed media projects. You can enter our challenge as many times as you like. A full list of the rules is on the challenge blog. For more inspiration please visit the Creative Artiste Challenge Blog to see the fabulous mixed media projects created by our multi talented team.
Remember to have fun crafting and enter your "Anything Mixed Media Goes" creations in our 
October challenge. 

I have entered this project in the following challenges:

Friday, 4 July 2025

Creative Artiste #117 July 2025

Even though we are now into July and most of the UK is enjoying a sunny heatwave, I'm still getting rained on doing the school run....

  ....Welcome to a new challenge at

Creative Artiste is a monthly challenge blog for everyone who likes to mix their media. So, as long as you like to use various mediums on your creations, we'd love to see you enter the challenge.
A big Thank You to everyone who entered the challenge last month. Your projects were all wonderful and our winners have been announced on the blog.
Our theme is always
"Anything Mixed Media Goes"
We have opportunities to be a Guest Designer for all our winners.


We were blessed last month with another beautiful granddaughter. I have decorated a canvas to go in her nursery. The canvas is 12"x 9" (30 x 23 cms).


1. I started by giving the canvas a coat of white gesso and when that was dry, I used a Tim Holtz stencil with some dark blue Memento ink to create a pattern of stars.
2. I chose a mix of chalk paints and acrylics in pastel colours to paint the canvas in random patches.
3. I stamped the word Dream using an old Bee Crafty stamp and the same blue Memento ink.
4. Once the stamp had dried, I dry brushed white gesso over the canvas to mute the colours and blend the patches of colour.


1. I bought the dream catcher from Samantha K Crafts. The MDF dream catcher came in a set with two other dream catchers.
2. I gave the dream catcher a coat of white gesso.
3. I then used the same 3 paints as on the canvas to paint the dream catcher.
4. I used Versamark and Utee to heat emboss the dream catcher to brighten the colours and give it a nice shine.


I used some Stampendous embossing powders to cover and decorate the canvas. 


One of the embossing powders is Shabby Blue Frantage which has a very fine shiny blue powder. It has given the canvas a lovely shimmer.


I heat embossed a selection of small metal elements in gold. Once the catcher was glued onto the canvas with Prima 3D Matt gel, I added the gold decorations.


Now it's your turn to have fun and create your mixed media projects. You can enter our challenge as many times as you like. A full list of the rules is on the challenge blog. For more inspiration please visit the Creative Artiste Challenge Blog to see the fabulous mixed media projects created by our multi talented team.
Remember to have fun crafting and enter your "Anything Mixed Media Goes" creations in our 
July challenge. 

I have entered this project in the following challenges:

Friday, 6 September 2024

Creative Artiste #108 September 2024

  ....Welcome to a new challenge at

Creative Artiste is a monthly challenge blog for everyone who likes to mix their media. So, as long as you like to use various mediums on your creations, we'd love to see you enter the challenge.
A big Thank You to everyone who entered the challenge last month. Your projects were all wonderful and our winners have been announced on the blog.
Our theme is always
"Anything Mixed Media Goes"
We have opportunities to be a Guest Designer for all our winners.


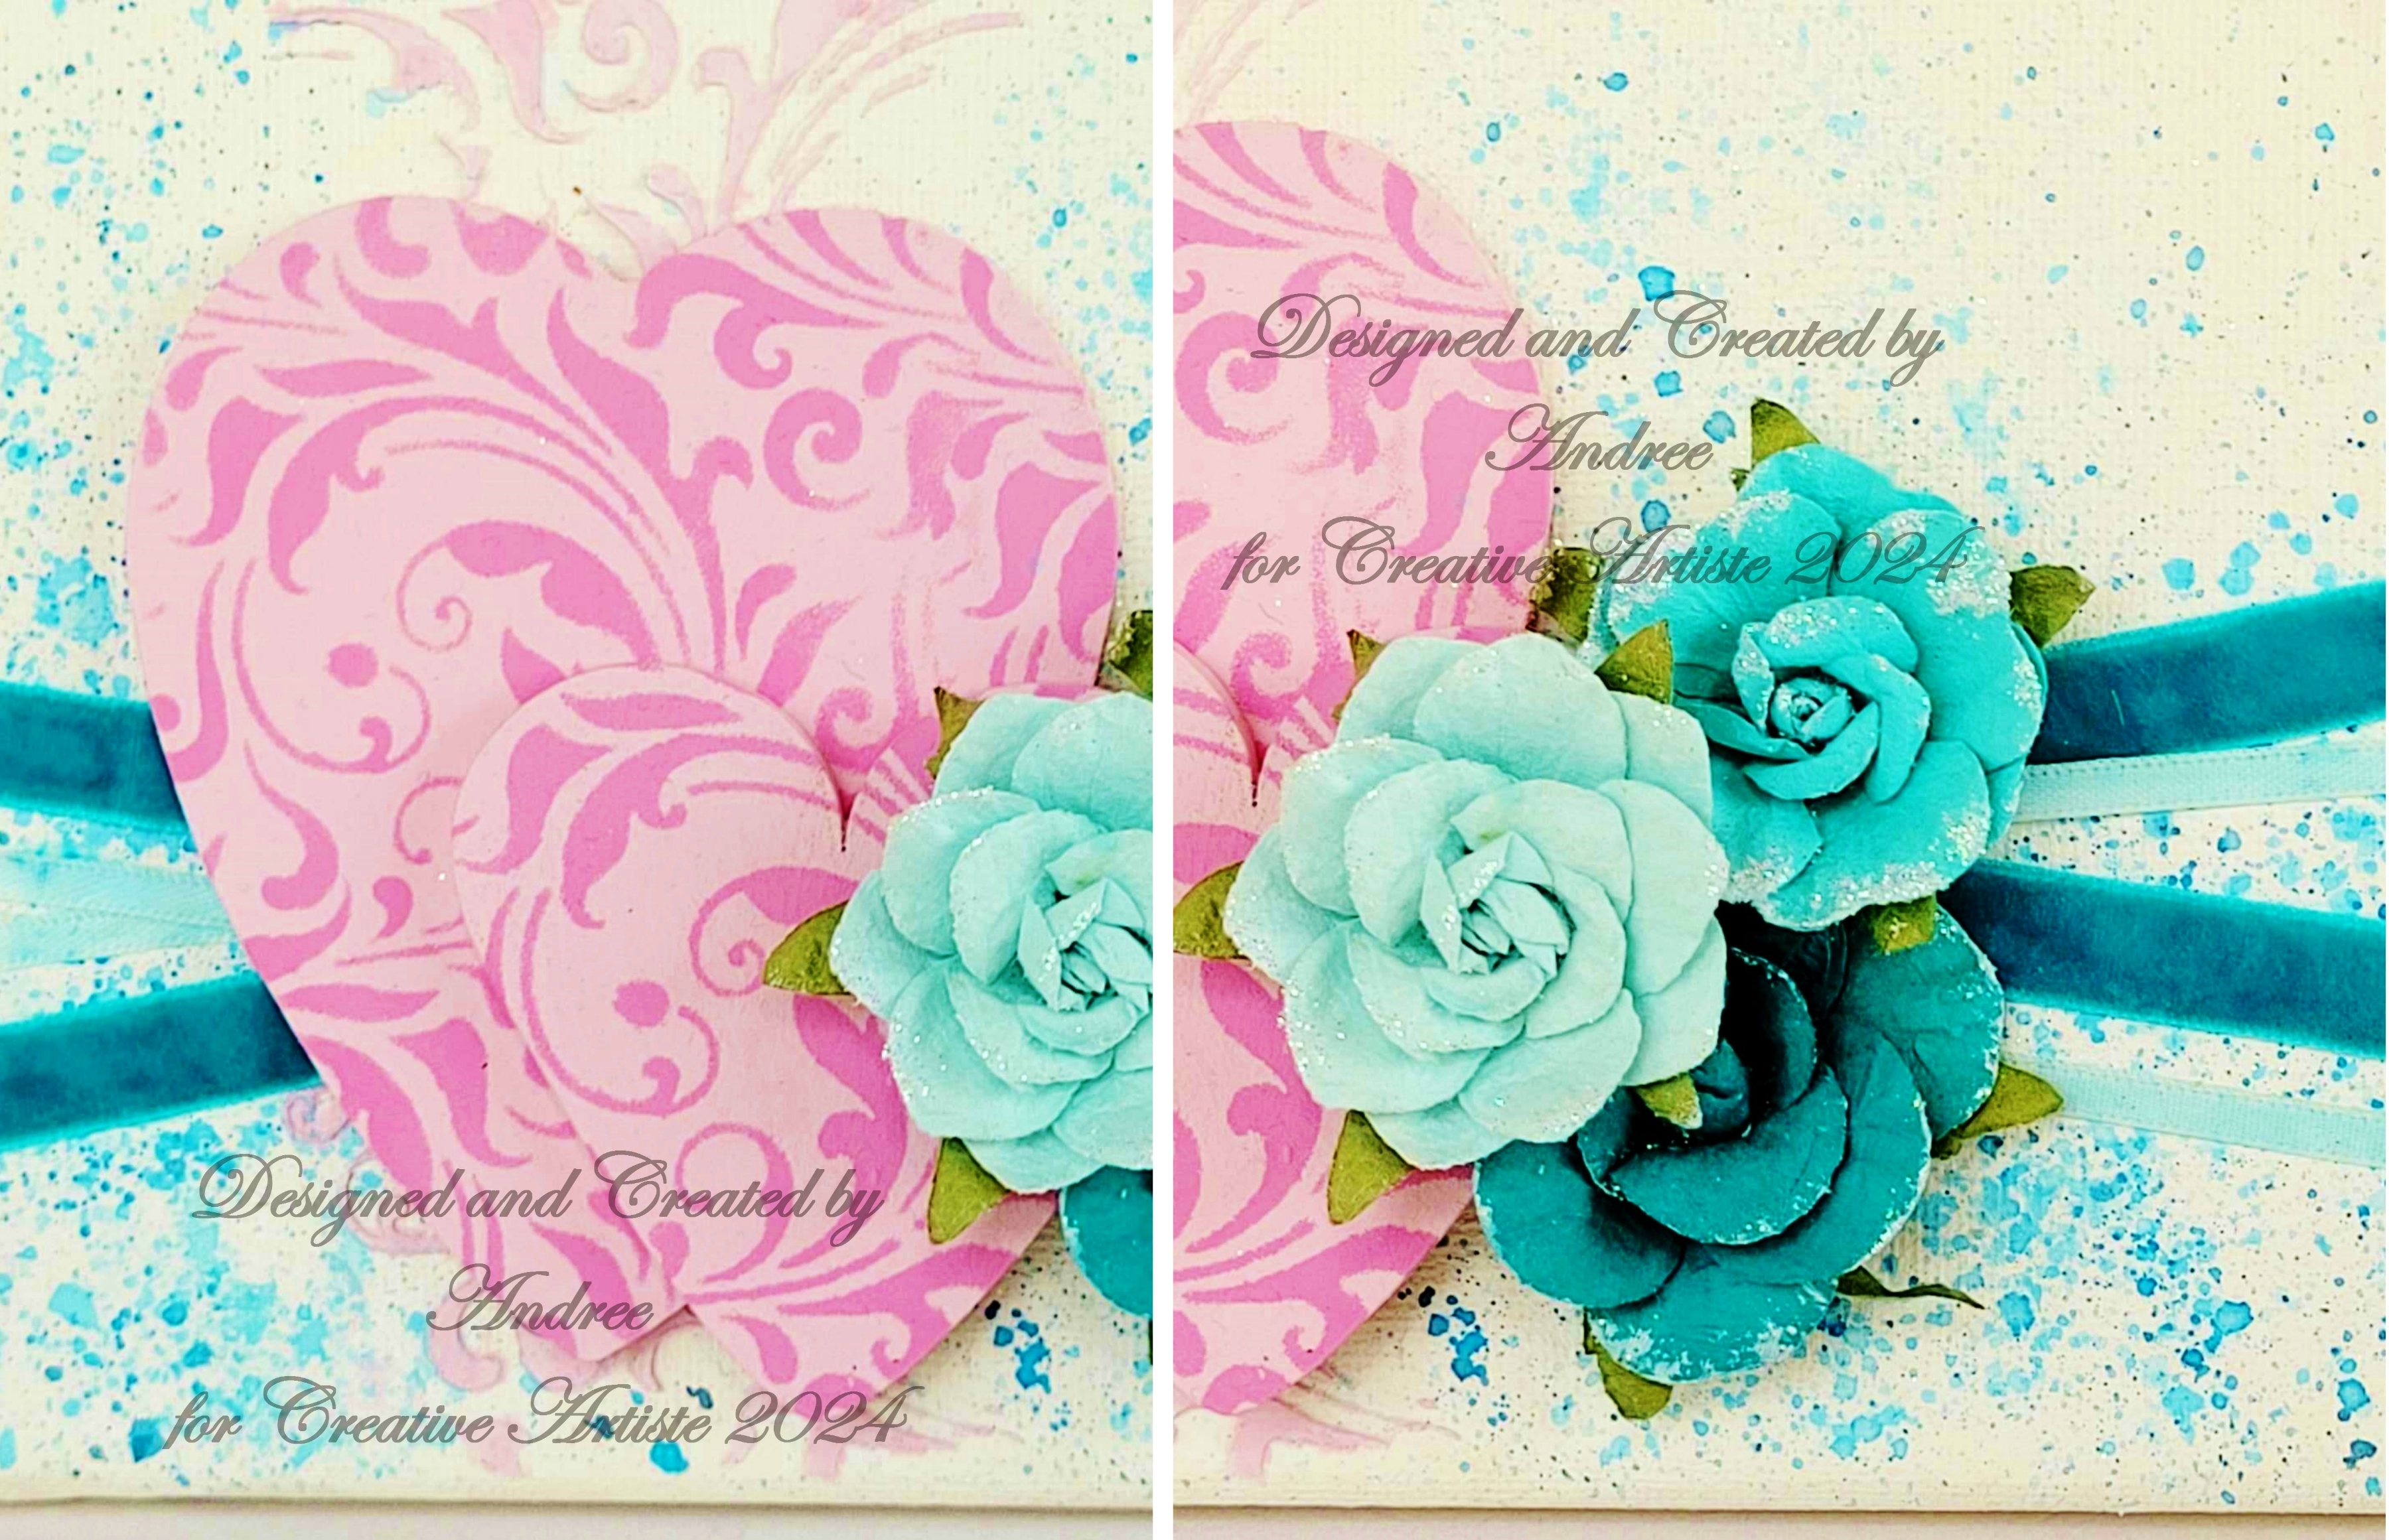
I've made an 8"x 8" (20 x 20cm) canvas.
I started by gessoing the canvas in white. I used an old Tim Holtz flourish stencil from Set 10 for the canvas and the wooden hearts.


I made some some texture paste with a pink acrylic paint this time and passed it through the stencil onto the canvas. I left it to dry.


I then spattered some watered down Salvaged Patina DOX and Mermaid Lagoon Distress Ink refill across the canvas.


While that dried I painted two wooden hearts with Pebeo matt Fairy Pink acrylic paint, dried them and used Picked Raspberry DOX with the stencil over the hearts.


I glued some lengths of ribbon across the canvas before gluing the hearts in place with Prima Heavy Body Gel and adding the pretty paper roses from Prima.

Now it's your turn to have fun and create your mixed media projects. You can enter our challenge as many times as you like. A full list of the rules is on the challenge blog. For more inspiration please visit the Creative Artiste Challenge Blog to see the fabulous mixed media projects created by our multi talented team.
Remember to have fun crafting and enter your "Anything Mixed Media Goes" creations in our 
September challenge. 

I have entered this project in the following challenges:

Friday, 1 December 2023

Creative Artiste #100 December 2023

 This is my second post for today. The first one is a set of Christmas cards for Crafts Galore Encore. Please scroll down for a look.

I am approaching the end of 2023 with mixed feelings. The year started off with such promise with two much anticipated weddings in the spring. Then it took a terrible turn with the events of the summer, ending with my beloved brother passing away with hardly any warning. I really don't remember much of autumn. It's all a blur through the tears. Winter is going to be a difficult season with Christmas and birthdays to get through as the family still grieve. But, I'll wear a smile and soldier on through.

I'm keeping my fingers crossed that 2024 will bring only good news and happy events. For everyone.

*I've copied this introduction from my earlier post as there really isn't anything more to say.*

Now, on a happier note ....

.... There is a celebration going on at Creative Artiste this month as it's our 100th challenge!

 Welcome to the 100th challenge at

Creative Artiste is a monthly challenge blog for everyone who likes to mix their media. So, as long as you like to use various mediums on your creations, we'd love to see you enter the challenge.
A big Thank You to everyone who entered the challenge last month. Your projects were all fabulous and our winners have been announced on the blog.

Our theme is always
"Anything Mixed Media Goes"
But we have decided to add an optional theme of
'Christmas' for December.
And for this month only, there will be a prize for our winner!
We still have opportunities to be a Guest Designer for all our winners though, as per usual.


As we have the optional theme of 'Christmas' this month, I've made a very typical Christmas decoration.

I made a nativity scene using some foam characters our little princess was given at church last year. They were to make an advent calendar but she wanted to play with them instead. This year they have been given a more permanent purpose.
The stable measures 7" w x 6" h x 3" d (18 x 15 x 8 cms).


Most of the project was prepping and creating the stable. I started by cutting out the pieces for the stable from strong greyboard and giving them a couple of coats of DecoArt Dark Chocolate acrylic paint. I then used a Tim Holtz woodgrain stencil with Black Soot Distress Ink to add the appearance of texture.


I assembled the stable using Heavy Body Gel. And then mixed texture paste with the Dark Chocolate acrylic paint and tapped it around the arched entrance. The tiles for the roof were created using greyboard, painted with Docraft's Burnt Sienna acrylic paint and fixed in place with more texture paste coloured with the paint. The last bit of prep was the 'straw'. I coloured some tissue paper with Squeezed Lemonade DOX and Scattered Straw DI before cutting it into thin strips.

I arranged the characters and fixed them in place with Heavy Body Gel before scattering the straw around them. Some of the pieces were glued to the outside of the stable.


The last angel is dangling on a thin strip cut from an acrylic sheet and fixed to the roof so she can happily  bounce around.
All the characters are firmly glued in place, so, it's not an interactive plaything. Instead, it makes for a cheerful, and thoughtful, decoration lest we forget the true meaning of Christmas.

Now it's your turn to have fun and create your mixed media projects. The 'Christmas theme' is only an option for December so you can still play along with your 'Anything Goes' projects. You can enter our challenge as many times as you like. A full list of the rules is on the challenge blog. For more inspiration please visit the Creative Artiste Challenge Blog to see the fabulous mixed media projects created by our multi talented team.
Remember to have fun crafting and enter your creations in our 
100th challenge. 

Have a fun festive season everyone, however you celebrate!

I have entered this project in the following challenges:

Friday, 4 August 2023

Creative Artiste #96 August 2023

....Welcome to a new challenge at

Creative Artiste is a monthly challenge blog for everyone who likes to mix their media. So, as long as you like to use various mediums on your creations, we'd love to see you enter the challenge.
A big Thank You to everyone who entered the challenge last month. Your projects were all wonderful and our winners have been announced on the blog.
Our theme is always
"Anything Mixed Media Goes"
We have opportunities to be a Guest Designer for all our winners.

I have created something a bit different for this month's inspiration. This is a 'Book Nook'. It's a small scene designed to nestle in a bookcase.
And as one of my daughters has always been obsessed with miniatures and books, this seemed like a perfect gift to make for her birthday.

The Book Nook was made from a kit designed and sold by CoolKatzcraft. The kit comes with all the panels and pieces in precision cut MDF. Also included is a mini LED lightbulb.
I assembled all the pieces and glued them into place - apart from a small removable section which gives access to the mini LED light positioned above the reading bench. 
The kit is called the Book Nook Intrigue Window Reading Nook and measures approx 6"x3" (15 x 7 .5cm) when assembled.

 I used a Tim Holtz brick stencil with some texture paste on the outside walls. Once dried, I painted the gaps between the bricks with DecoArt Fluid Acrylic Titan Buff. I then repositioned the stencil to protect the gaps whilst I painted the brickwork with DecoArt Fluid Acrylics in Quinacridone Gold, Yellow Iron Oxide and Diarylide Yellow.


I then turned to the inside and patiently used  DecoArt Acrylics in Grey Sky and Sunny Day to paint the walls, floor, window frame and shelves. I also printed a small photo of our local Pembroke Castle to use as the view through the window. I painted curtains on a piece of card and stuck that on the back of the photo and  mounted them behind the window frame with a piece of acrylic from the kit.


I made the bench cushion seat by covering a small piece of foam with felt and stitched some scatter cushions from felt. The small table was made with paper clay, painted in Yellow Iron Oxide acrylic, and an old bottle top. The slice of cake and plate are also made from paper clay.


I sourced miniature decorations from my stash, including a clock, cup and saucer, binoculars, jars, a wicker heart and a trumpet. I glued them all in place. I made the fruit bowl with apples and the basket of oranges from paper clay and painted them using fluid acrylics.


I had the most fun creating the tiny books. There are 75 of them and they are all less than 1" (2 .5cm) high. There are two sizes - paperbacks and hardback/albums. Some have paper pages, some are thick card and some are blocks of MDF supplied in the kit. The covers are either patterned papers I've die-cut or card I'd painted before die-cutting. CoolKatz sell the dies to create the book covers and pages.

Now it's your turn to have fun and create your mixed media projects. You can enter our challenge as many times as you like. A full list of the rules is on the challenge blog. For more inspiration please visit the Creative Artiste Challenge Blog to see the fabulous mixed media projects created by our multi talented team.
Remember to have fun crafting and enter your "Anything Mixed Media Goes" creations in our 
August challenge. 

I have entered this project in the following challenges:

Friday, 3 February 2023

Creative Artiste #90 February 2023

The Creative Artiste team has been taking a break during January to recharge their creativity.

But now we are back!

So, 

 ....Welcome to the first challenge of 2023 at

Creative Artiste is a monthly challenge blog for everyone who likes to mix their media. So, as long as you like to use various mediums on your creations, we'd love to see you enter the challenge.
A big Thank You to everyone who entered the challenge in December. Your projects were all fabulous and our winners have been announced on the blog.
Our theme is always
"Anything Mixed Media Goes"
We have opportunities to be a Guest Designer for all our winners.

Normally I don't like flying insects. Actually, I don't much like insects at all, but I kept finding myself attracted to these rather fabulous looking moths and finally treated myself to them for Christmas. I have showcased them on a canvas and called it
"Time to Fly"

I made the moths, cogs and clocks from resin using Prima moulds. They are Mecha Moth, Clock Faces, and Machine Parts.
I used texture paste through a Tim Holtz star stencil randomly over the canvas then painted it with DecoArt acrylic paints in shades of blue.

Before fixing to the canvas, I painted the moths using DecoArt acrylic paints. Whilst the paint was still wet I sprinkled gold gilding flakes on the wings and dabbed them in place. I sealed the wings with Matt Mod Podge once dry.

 I assembled the resin elements - except the moths -  with Prima's Heavy Body Gel onto the canvas. Once dry I painted the elements with White and Baby Blue acrylic paints. I then added touches of DecoArt Prussian Blue Fluid acrylic paint, allowing it to run onto the canvas around the arrangement.

Lastly, I added the three moths and dry brushed all the elements and areas of the canvas with gold acrylic paint.

Now it's your turn to have fun and create your mixed media projects. You can enter our challenge as many times as you like. A full list of the rules is on the challenge blog. For more inspiration please visit the Creative Artiste Challenge Blog to see the fabulous mixed media projects created by our multi talented team.
Remember to have fun crafting and enter your "Anything Mixed Media Goes" creations in our 
February challenge. 

I have entered this project in the following challenges: