Easter Bliss

Saturday, 24 December 2016

Christmas Cards Part Three

One more sleep to go then we can all relax for a few days and wonder what all the fuss was for. 
Some people like to make their Christmas cards throughout the year but I prefer to gather all my Christmas themed craft goodies together in November and spend a couple of weeks making my cards. I find it easier than dipping in and out making a few cards at a time.
Today I have the last of this year's Christmas cards to show you.

These cards were made with acetate and stamps from Chloe. Lots of stamping, heat embossing and cutting out was involved.
The papers are from First Edition which were matted onto silver mirri card.

I used my Sizzix Bigz Tattered Poinsettia die for the flowers and a Spellbinders die for the sentiment panels. The sentiment stamps are from Docrafts. The cards were finished with seam binding ribbon bows.

The last variety of cards I made this year were made with all the layers of the Tim Holtz Tattered Poinsettia die. Some of the papers I used were coloured with Brushos. The background is an X-cut  embossing folder and the ribbons are from my stash. The flowers were finished off with Shabby White Frantage.

All that remains now is to wish you all a 
Merry and Peaceful Christmas.

Saturday, 17 December 2016

Christmas Cards Part 2

Barely a week till the big day to go now. How are your preparations coming along? Just food shopping and festive fun left for us. It's the last Saturday before Christmas. The shops are going to be manic so I'm staying home and will be spend the day wrapping up the last of the presents. 
I have some more of my mixed media cards to show today. 

Again these cards involved papers from Maja Design, Dovecraft and Paper Studio. I used texture paste, stencils, gesso and paint on some of them.
The cards all (just about) fit into 6" x 6" (20 x 20 cm) envelopes.

I loved going over the top with the die-cuts and glitter on this style of cards. The pretty laces and trims are from NoorDesign and Docrafts.

The bows are made with white seam binding. Some have been coloured using Distress Inks. The berry sprigs are from NoorDesign and the poinsettias were made using the Sizzix Bigz Tattered Poinsettia Tim Holtz die.
Not all the Christmas cards I made this year are in this style. I still have time to show you different cards next week. In the meantime have a fun weekend and enjoy your Christmas preparations.

Wednesday, 14 December 2016

Christmas Cards Part 1

I hope you are all enjoying your Christmas preparations and are not panicking too much.
I did say I would show some more of the Christmas projects and cards I have made recently and seeing as now that all my cards have been mailed I am showing some of those cards.
I made a few different types of cards. These are some of the 'mixed media' ones.

All of these cards have been made using a mix of papers including Maja Design, Dovecraft and Paper Studio. I've used texture paste and paint to 'enhance' some of them. These cards all fit in 6" x 6" (15 x 15 cm) envelopes - just.

The vintage images were sourced from the internet. I printed them in colour and again in a more muted version.

I cut the die-cuts mostly in white and used Distress Inks to colour or shade them. I also painted some of them with Glamour Dust and added extra glitter.
The majority of the Christmas cards I made this year are this style and I really enjoyed making them. I have more to show so will be back in a few days with another batch.
I'm off to teach my last class for this year today. The ladies - and some men - are going out to lunch afterwards to celebrate. I hope you all have time to do something fun during this busy time.

Wednesday, 7 December 2016

Christmas Wreaths

Hi everyone, how are your Christmas plans coming along? I've seen some lovely blog and Facebook posts of everyone's Christmas projects and cards. I have been making things too but I forget to share them. As I will soon run out of time to show my Christmas themed projects I thought I'd better get a move on.
I tutor weekly mixed media and technique classes at a fabulous local craft shop (see sidebar) and recently we held a workshop to make Christmas wreaths. There were three options to choose from and these are my samples.

The most popular option was the poinsettia wreath. The flower dies are from Marianne. The central sentiment die is from X-cut. On the workshop day a simpler Christmas tree die was used with a sentiment.

A braided cord, some beads, jingle bells and organza ribbon were used for the trimmings and the wreaths were finished off with a dusting of Shabby White Frantage.


Another popular wreath was the fern and pine cone one.

The fern die is from Marianne and the pine cone ones are from Elizabeth Craft Designs.

This wreath was finished off with Chunky Gold Frantage, braided cord, hessian ribbon and a sentiment.


The third wreath was the holly option.

This involved lots of leaves from Elizabeth Craft Designs and Marianne dies. I used a glue pen to add Chunky Gold Frantage and glittered the berries.

The wreaths were finished with braided cord, hessian ribbon and a sentiment.

A very big Thank You goes to Cheryl and Janet for doing all the die-cutting, packing the kits and workshop preparation.
There were twenty four wonderful wreaths created on the workshop day and another eight in class. Some people bought extra kits to make more wreaths at home. Everyone worked hard and should be very proud of their finished wreaths.
I shall be back soon to share some of my Christmas cards with you. Until then, have fun with your Christmas preparations.

Friday, 2 December 2016

Creative Artiste #21 December 2016

The first Friday of the month means it's the start of a new challenge at Creative Artiste.  We are a challenge blog for everyone who likes to mix their media. So, as long as you like to use various mediums on your creations we'd love to see you enter the challenge. This is a month long challenge so you have time to create projects and enter up to three times. A full list of the rules is on the challenge blog.
A big Thank You to everyone who entered Challenge #20 in November. Your projects were wonderful and the winner has been announced on the blog. 

Our theme is this month is
"Anything Mixed Media Goes"
and we are sponsored by
         
Scrapmatts and Papertole Australia

I'm sharing a Christmas present I've made for a very special person in our family to use as a memory box.


I glued a piece of card on the top of one of my precious Craft Box boxes. Firstly I used texture paste through a star stencil and painted it all white. I then lightly rubbed gold gilding wax over the stars and edges.

I cut up some Retro Squares 02 from Scrapmatts and painted them white then added gold Frantage before sticking the pieces down. The vintage photos are from the internet and I printed them with a pinkish tinge. I added one photo to the beautiful cabochon from Craft Box and tucked some little detail pieces around the photos and flowers.

I placed a die-cut pink doily in one corner and used the Tim Holtz Tattered Flowers die to create the flowers with pearlised card. I Frantaged the edges and central pearls. The centrepiece on the large flower came from a bracelet.

As this is intended as a memory box I thought this sentiment from Bee Crafty was very apt. I stamped it in brown ink onto pink card.

Lastly I added pink ribbon and some floral lace around the box and finished off the front with a SnipArt frame and chipboard word. Both were painted pink and Frantaged.

Please visit the Creative Artiste Challenge Blog to see the wonderful mixed media projects created by our talented team and meet our new member who is joining us from today. 
As this is our last challenge for 2016 I'd just like to say a big Thank You to all our lovely followers and wish you all a Merry Christmas. We hope to see you all back in 2017.
Remember to have fun and enter your "Anything Mixed Media Goes" creations in the challenge.

I've entered this project into the following challenges:
http://alteredeclectics.blogspot.co.uk/2016/11/december-challenge.html
http://rheddscreativespirit.blogspot.co.uk/2016/12/decembers-challenge.html x

Thursday, 1 December 2016

Crafts Galore Encore December 2016

The first of the month means it's the start of a new challenge on the Crafts Galore Encore Challenge Blog
Thank you to everyone who joined in with November's challenge. The winners are on the challenge blog's 'winner's page'. This is a month long challenge and you can enter up to three times. A full list of rules are on the challenge blog.

Our theme this month is the popular
"Anything Goes"
and our sponsor is
Sherri Baldy
The prize will be the three fabulous images that the DT have used.

As it's nearly Christmas I thought I'd better make a Christmas card.

This card will fit in an 8"x 8" (20 x 20 cm) envelope. The base panel is covered with a plain paper from my stash. The spotty papers are from The Paper Studio. All panels have been matted onto green card.

This gorgeous image is IMG 924 and I coloured her with my Copics. I cut her out using an X-cut scalloped oval die and edged it with Antique Linen Distress Ink.

I fussy cut the poinsettias from some old First Noel paper from Papermania and layered a couple of them up. The vintage style lace is from my stash. I added some fibres for a bit of texture. The words were also cut from the First Noel paper.
Now please visit the  Crafts Galore Encore challenge blog to see the wonderful projects and cards created by the rest of the talented team and to enter your "Anything Goes" creations.
As this is our last challenge for 2016 I'd like to wish you all a very Merry Christmas.

I've entered this project into the following challenges:
http://worldwideopendesignteamchallenge.blogspot.co.uk/2016/11/15th-november-2016-world-wide-open.html x
http://scrapbookstampsocietychallengeblog.blogspot.co.uk/2016/11/challenge-105-anything-goes.html x
http://artbymiranchallenge.blogspot.co.uk/2016/11/challenge-72-anything-goes.html Winner
http://classicdesignteamchallenge.blogspot.co.uk/2016/12/1st-december-2016-classic-design-team.html x
http://deepoceanchallengeblog.blogspot.co.uk/2016/11/challenge-143-santa-is-coming-to-town.html x
http://countryviewchallenges.blogspot.co.uk/2016/12/december-2016-christmas.html
http://bestieschallenge.blogspot.co.uk/2016/12/winter-time-at-besties-international.html x

Friday, 11 November 2016

Remembrance Poppies

Today is Remembrance Day in Britain. The First World War officially ended on the eleventh hour of the eleventh day of the eleventh month in 1918 and we remember those who lost their lives with a two minute silence at 11 am. The poppy has become a well known symbol of remembrance as it was made popular by the poem In Flanders Fields inspired by the sea of red flowers that thrived on some of the worst battlefields of the war. 
For Remembrance Day today I thought I'd show you two cards I've made with one of the loveliest poppy stamps.
The stamp is the Limited Edition 2016 Poppy from Bee Crafty. A donation of £2 will be made to the Royal British Legion for every one of these stamps sold.


This card is 6" x 6" (15 x 15 cm) I stamped the poppy onto watercolour card with black Archival ink and painted it with Brushos. The background border was created with Brushos too.

I coloured the poppy by wetting the image in small areas,  sprinkling on Scarlet and Brilliant Red powders and blending with my brush. 

I used Leaf Green and Emerald Green for the stems. I then stamped the Remember sentiment that comes with the poppy stamp and used a stencil with a Copic pen to create the red raindrops.


This second card is 8"x 8" (20 x 20 cm). I stamped the poppy and the sentiment onto white card and after colouring the poppy I matted and layered them onto red and green card.

I used Copics to colour the poppy.

I used back card for the background and stamped just the poppy head with Versamark and heat embossed in gold.
Towns and cities across Britain will commemorate Remembrance Day with  civic services on Sunday which, as the second Sunday of November, is known as Remembrance Sunday.
Have a lovely Remembrance weekend everyone.

Friday, 4 November 2016

Creative Artiste #20 November 2016

Hopefully this post finds you all getting ready for a lovely weekend. And all being well, I am at the craft show at the NEC in the UK having a fabulous time with friends and family.
The first Friday of the month means it's the start of a new challenge at Creative Artiste.  We are a challenge blog for everyone who likes to mix their media. So, as long as you like to use various mediums on your creations we'd love to see you enter the challenge. This is a month long challenge so you have time to create projects and enter up to three times. A full list of the rules is on the challenge blog.
A big Thank You to everyone who entered Challenge #19 in October. Your projects were wonderful and the winner has been announced on the blog. 

Our theme is this month is
"Anything Mixed Media Goes"
and we are sponsored by

Details of the prize are on the challenge blog.

I have done another 12" x 10" (30.5 cm x 25.5 cm) canvas for this month's DT project.

I started with texture paste and a Stamposaurus stencil. When that was dry I painted the canvas in blue and purple acrylic paint, darkening the colours towards the edges, and added splashes of white paint. Once everything was dry I stamped Believe in the corner with a stamp from Bee Crafty.

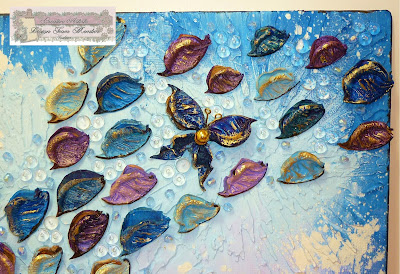
While shopping one day I spotted a bag of unusual looking potpourri. I thought some of the seeds looked like butterflies. (Probably just my bad eyesight). I sprayed some of the seeds and painted others before arranging on the canvas. 

I added clear half pearls and blue beads in between the 'butterflies'. I made gold wire antenna for the big butterflies and gave them a gold pearl each.

To finish I added Pebeo gold gilding wax to the butterflies.

Please visit the Creative Artiste Challenge Blog to see the wonderful mixed media projects created by our talented team. Remember to have fun and enter your "Anything Mixed Media Goes" creations in the challenge.

I've entered this project into the following challenges:

Tuesday, 1 November 2016

Crafts Galore Encore November 2016

I hope you all survived the ghosties and ghouls of Halloween and enjoy the rest of your week. I shall be heading to the NEC later this week for a few fun days visiting the various craft shows and exhibitions. Maybe you're going too?
The first of the month means it's the start of a new challenge on the Crafts Galore Encore Challenge Blog
Thank you to everyone who joined in with October's challenge. The winners are on the challenge blog's 'winner's page'. This is a month long challenge and you can enter up to three times. A full list of rules are on the challenge blog.

Our theme this month is the popular
"Anything Goes"
and our sponsor is
The Fantasy Art of Nikki Burnette

The team were lucky enough to receive an image each from Nikki Burnette and I made a card with mine.

I created the blue background with Brushos on watercolour paper and fixed it onto an 8"x 8" ( 20cm x 20cm) card blank. I stuck down some string netting across the base before fixing the orange panel which was also created with Brushos.

The image I chose is Mermaid Stamp - Jayna and I coloured it with my Copics. I dusted around the image with a blue Pan Pastel and cut it out with an X-cut scalloped oval die.

I die-cut the anchor from white card using a Spellbinders die. I dabbed it with Pebeo Sand Texture Paste then painted it with dark brown acrylic paint. I added some DecoArt Media Quinacridone Gold and Yellow Iron Oxide, My intention was to give a rusted appearance to the anchor.

I used Sizzix Thinlets dies on card coloured with Brushos to create the plants and finished the card with some real shells.

Now please visit the  Crafts Galore Encore challenge blog to see the wonderful projects and cards created by the rest of the talented team and to enter your "Anything Goes" creations.
I've entered this project into the following challenges:
http://classicdesignteamchallenge.blogspot.co.uk/2016/11/1st-november-2016-classic-design-team.html x
http://worldwideopendesignteamchallenge.blogspot.co.uk/2016/10/15th-october-2016-world-wide-open.html DT Favourite
http://deepoceanchallengeblog.blogspot.co.uk/2016/11/challenge-141-use-die-cuts-or-punches.html x
http://craftycardmakers.blogspot.co.uk/2016/10/176-explosion-of-colour.html Top Five
http://scrapbookstampsocietychallengeblog.blogspot.co.uk/2016/10/challenge-103-anything-goes-option.html x

Crafts Galore Encore November 2016

I hope you all survived the ghosties and ghouls of Halloween and enjoy the rest of your week. I shall be heading to the NEC later this week for a few fun days visiting the various craft shows and exhibitions. Maybe you're going too?
The first of the month means it's the start of a new challenge on the Crafts Galore Encore Challenge Blog
Thank you to everyone who joined in with October's challenge. The winners are on the challenge blog's 'winner's page'. This is a month long challenge and you can enter up to three times. A full list of rules are on the challenge blog.

Our theme this month is the popular
"Anything Goes"
and our sponsor is
The Fantasy Art of Nikki Burnette

The team were lucky enough to receive an image each from Nikki Burnette and I made a card with mine.

I created the blue background with Brushos on watercolour paper and fixed it onto an 8"x 8" ( 20cm x 20cm) card blank. I stuck down some string netting across the base before fixing the orange panel which was also created with Brushos.

The image I chose is Mermaid Stamp - Jayna and I coloured it with my Copics. I dusted around the image with a blue Pan Pastel and cut it out with an X-cut scalloped oval die.

I die-cut the anchor from white card using a Spellbinders die. I dabbed it with Pebeo Sand Texture Paste then painted it with dark brown acrylic paint. I added some DecoArt Media Quinacridone Gold and Yellow Iron Oxide, My intention was to give a rusted appearance to the anchor.

I used Sizzix Thinlets dies on card coloured with Brushos to create the plants and finished the card with some real shells.

Now please visit the  Crafts Galore Encore challenge blog to see the wonderful projects and cards created by the rest of the talented team and to enter your "Anything Goes" creations.
I've entered this project into the following challenges:
http://classicdesignteamchallenge.blogspot.co.uk/2016/11/1st-november-2016-classic-design-team.html
http://worldwideopendesignteamchallenge.blogspot.co.uk/2016/10/15th-october-2016-world-wide-open.html
http://deepoceanchallengeblog.blogspot.co.uk/2016/11/challenge-141-use-die-cuts-or-punches.html
http://craftycardmakers.blogspot.co.uk/2016/10/176-explosion-of-colour.html
http://scrapbookstampsocietychallengeblog.blogspot.co.uk/2016/10/challenge-103-anything-goes-option.html

Sunday, 23 October 2016

Canvas Birthday Card

I hope you are all enjoying your weekend. Mine is passing by in a blur of busyness but I wanted to take time out to show you a birthday card I made recently.
This card is based on the canvas I made for the current Creative Artiste challenge. It's A5 in size, so a good deal smaller but the main elements are there.

I started by painting a panel of mixed media card in lilac acrylic. I scruffed the edges and added Shabby White Frantage and Pebeo gold gilding wax. The next layer was created with a couple of acrylic paints in pinks. I then used lilac coloured texture paste through a Tim Holtz flourish stencil and splattered with gold Frantage. Again the edges were scruffed before I mounted both layers on to a card blank.

I used a frame stamp and the Believe verse stamp from Bee Crafty to create the sentiment panel. I cut around it, scruffed it and added Frantage. I used metal charms from Craft Box to create the flower above the sentiment. I painted them white, added a painted purple half bead and Frantaged.

I painted and Frantaged a wooden frame. The heart locket is an X-cut die that I gold embossed. I die cut two butterflies from card and dabbed them with gold gilding wax. I added a brass key.

To finish I dabbed white acrylic onto the second butterfly with the gold gilding wax.
I'm pleased to say that the card arrived safely at it's destination so I can now show it.
The original canvas can be found here. It now lives with one of my daughters.
I hope you all have a lovely week. I'd better get back to work.